Contents
Service
在Kubernetes中,Service是充当基础内部负载均衡器的一种组件。
Service会将相同功能的Pod在逻辑上组合到一起,一般会采用标签选择器进行组合,让它们表现得如同单个实体。
Service与Pod
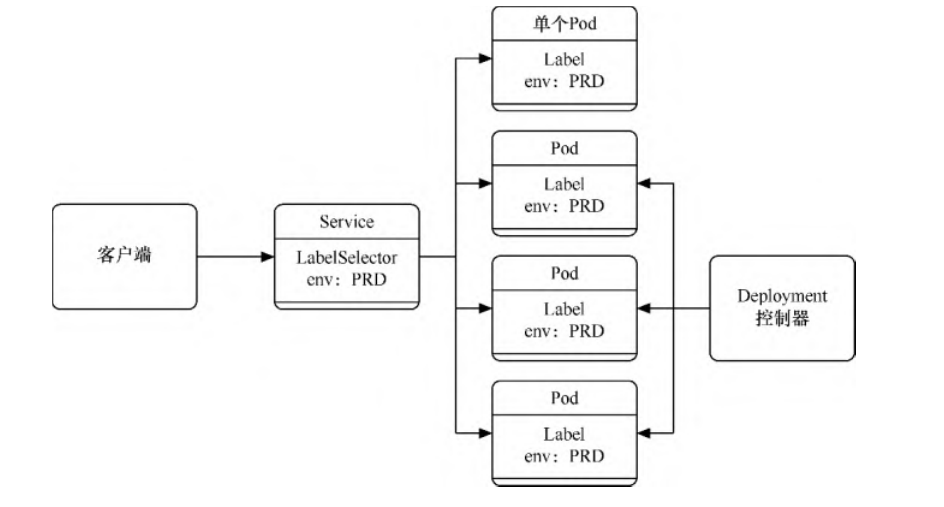
Service可以发布服务,可以跟踪并路由到所有指定类型的后端容器。
内部使用者只需要知道Service提供的稳定端点即可进行访问。另外,Service抽象可以根据需要来伸缩或替换后端的工作单位,无论 Service具体路由到哪个Pod,其IP地址都保持稳定。通过Service,我们可以轻松获得服务发现的能力。
Service可以定义一组Pod的访问策略,供Kubernetes集群内部使用,或供集群外的机器使用。Service还可以将集群外所提供的服务抽 象化,有组织地给内部Pod使用。
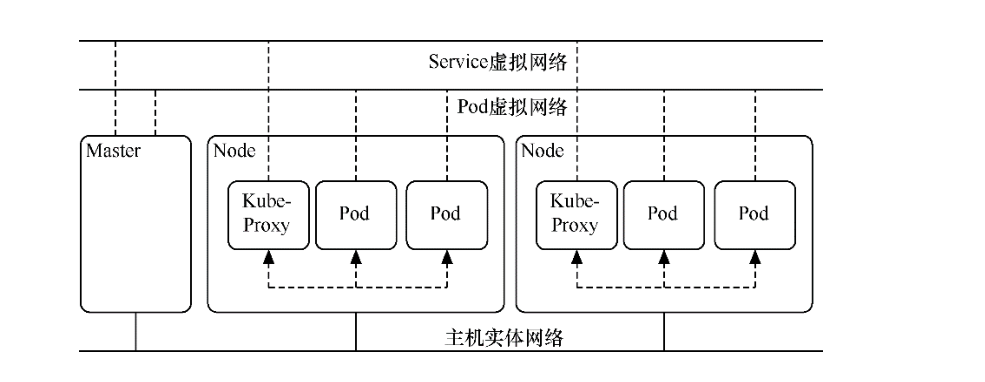
和Pod一样,在Kubernetes中Service也属于虚拟网络,只有Master节点和Node属于实体网络,
Pod和Service的IP地址只在Kubernetes集群(即Master和Node)内能访问,集群外部的机器是无法访问的。
如果要想让外部机器能访问,对于Pod,可通过之前讲过的将Pod映射到HostPort上的方法来实现;
而对于Service,通常的办法是配置NodePort或LoadBalancer的Service,或者给Service配置ExternalIP,以便将Service映射到Master或Node上,供外部机器访问。
Kubernetes网络
Service的模板如下。
apiVersion: v1
kind: Service
metadata: #元数据
  name: string #Service的名称
  namespace: string #Service所属的命名空间
  labels: #Service的标签
    - name: string
  annotations: #Service的注解
    - name: string

spec:
  selector: [ ] #标签选择器,将选择具有指定标签的Pod作为管理范围
  type: string #Service的类型,分为clusterIP、NodePort、LoadBalancer、ExternalName
  clusterIP: string #虚拟服务的地址
  sessionAffinity: string #指定是否支持session,[ClientIP|None] 表示将同一个客户端的访问请
  #求都转发到同一个后端
  ports: #Service需要暴露的端口
  - name: string #端口名称,区分不同应用的端口
    protocol: string #使用的协议
    port: int #Service监听的端口
    targetPort: int #发送到后端应用的端口
    nodePort: int #当spec.type=NodePort时,指定映射到物理机的端口
status: #当spec.type=LoadBalancer时,设置外部负载均衡器的地址
  loadBalancer:
    ingress:
      ip: string #外部负载的IP地址
       hostname: string #外部负载均衡的主机名
Service目前可定义为5个大类。通过spec.type属性可定义
ClusterIP、NodePort、LoadBalancer、ExternalName这4类Service。
而ClusterIP类服务还可以分为普通Service和无头Service两类,所以总共分为5类。
1. 3个向外发布服务方式
3种向外发布的方式分别如下。
ClusterIP-普通Service:这是默认方式,使用时可以不填写
spec.type。在Kubernetes集群内部发布服务时,会为Service分配一个集群内部可以访问的固定虚拟IP(即ClusterIP)地址。集群中的机器(即Master和Node)以及集群中的Pod都可以访问这个IP地址。NodePort:这种方式基于ClusterIP方式,先生成一个ClusterIP地址,然后将这个IP地址及端口映射到各个集群机器(即Master 和Node)的指定端口上。这样,Kubernetes集群外部的机器就可以通过“NodeIP:Node端口”方式访问Service。
LoadBalancer:这种方式基于ClusterIP方式和NodePort方式,除此以外,还会申请使用外部负载均衡器,由负载均衡器映射到各 个“NodeIP:端口”上。这样,Kubernetes集群外部的机器就可以通过负载均衡器访问Service。
定义模板文件,创建一个名为exampledeployforservice.yml的模板文件
apiVersion: apps/v1
kind: Deployment
metadata:
  name: exampledeployforservice
spec:
  replicas: 3
  selector:
    matchLabels:
      example: exampleforservice
  template:
    metadata:
      labels:
        example: exampleforservice
    spec:
      containers:
      - name: pythonservice
        image: python:3.7
        imagePullPolicy: IfNotPresent
        command: ['sh', '-c']
        args: ['echo "<p>The host is $(hostname)</p>" > index.html; python -m http.server 80']
        ports:
        - name: http
          containerPort: 80
各个Pod的标签为“example: exampleforservice”,后续建立Service时会用到这个标签。
通过模板创建Deployment
$ kubectl apply -f exampledeployforservice.yml
Deployment控制器创建完毕后,先通过kubectl get pod -o wide命令查看部署情况。可以看到各个Pod都已经创建,它们都有自
己独立的虚拟IP地址。
$ kubectl get pod -o wide
NAME                                       READY   STATUS    RESTARTS   AGE     IP            NODE            NOMINATED NODE   READINESS GATES
exampledeployforservice-65cd75b4bb-4z4rv   1/1     Running   0          2m39s   10.0.15.74    gitee-k8s-w10   <none>           <none>
exampledeployforservice-65cd75b4bb-ff797   1/1     Running   0          2m39s   10.0.18.149   gitee-k8s-w25   <none>           <none>
exampledeployforservice-65cd75b4bb-vjkvs   1/1     Running   0          2m39s   10.0.18.73    gitee-k8s-w25   <none>           <none>
我们创建了3个Pod,分别对应于3个IP地址。以第一个Pod为例,因为在这个Pod中已经搭建了一个Web服务(端口为80,虚拟IP地址为 10.0.15.74)
所以在node或者master上通过访问这个地址就可以访问这个Pod中的服务,如执行以下命令
[root@gitee-k8s-w04 ~]# curl 192.168.1.35
前面已经提过,因为Pod的IP地址不是固定的,而且直接访问Pod的IP地址也无法实现负载均衡,所以会以Service作为入口,提供稳定的IP地址及负载均衡功能,供集群内外使用。
1.1 通过ClusterIP发布
普通Service
exampleclusteripservice.yml
kind: Service
apiVersion: v1
metadata:
  name: exampleclusteripservice
spec:
  selector:
    example: exampleforservice
  ports:
    - protocol: TCP
      port: 8080
      targetPort: 80
  type: ClusterIP
type表示Service的类型。该Service的类型为ClusterIP,可以通过
spec.clusterIP属性自定义ClusterIP虚拟地址,但在本 例中没有设置这个属性,Kubernetes会随机分配一个ClusterIP虚拟地址。selector表示标签选择器。Service会寻找匹配“example:exampleforservice”的所有Pod,并将它们组织到一个Service 中。之前我们已经创建了3个这样的Pod。
ports表示Service发布端口的设置。
protocol表示使用的协议。
port表示Service对外提供的端口,可以通过“ClusterIP:端口”访问服务。
targetPort表示对应的后端应用(即Pod)的端口。
运行以下命令,通过模板创建Service。
$ kubectl apply -f exampleclusteripservice.yml
Service创建成功后,可以通过以下命令查看Service。
$ kubectl get service
NAME                      TYPE        CLUSTER-IP     EXTERNAL-IP   PORT(S)    AGE
exampleclusteripservice   ClusterIP   10.97.98.205   <none>        8080/TCP   <invalid>
kubernetes                ClusterIP   10.96.0.1      <none>        443/TCP    168d
可以看到,Service已成功创建,自动生成的ClusterIP虚拟地址为10.97.98.205 ,端口为8080。可以通过10.97.98.205 :8080访问各个Pod所提供的服务。
[root@gitee-k8s-w04 ~]# for i in {1..10};do curl 10.97.98.205:8080  ;done
<p>The host is exampledeployforservice-65cd75b4bb-ff797</p>
<p>The host is exampledeployforservice-65cd75b4bb-4z4rv</p>
<p>The host is exampledeployforservice-65cd75b4bb-vjkvs</p>
<p>The host is exampledeployforservice-65cd75b4bb-vjkvs</p>
<p>The host is exampledeployforservice-65cd75b4bb-4z4rv</p>
<p>The host is exampledeployforservice-65cd75b4bb-vjkvs</p>
<p>The host is exampledeployforservice-65cd75b4bb-vjkvs</p>
<p>The host is exampledeployforservice-65cd75b4bb-4z4rv</p>
<p>The host is exampledeployforservice-65cd75b4bb-ff797</p>
<p>The host is exampledeployforservice-65cd75b4bb-4z4rv</p>
可以看到,通过“ClusterIP:端口”可以成功访问各个Pod上的Web服务,无须关注具体的Pod地址。另外,Service已经实现了负载均 衡功能,访问时会按比例随机分配到3个Pod中的1个。
通过以下命令可以查看Service的具体信息。
$ kubectl describe service {Service名称}
在本例中使用了kubectl describe servic eexampleclusteripservice命令,可以看到这个Service的各个信息。
其中最重要的信息是Endpoints属性,可以看到这里列出了所有Pod的IP地址与公布的端口。
当调用Service时,会按比例随机转发到Endpoints后面列出的一个地址上面。
$ kubectl describe svc exampleclusteripservice
Name:              exampleclusteripservice
Namespace:         default
Labels:            <none>
Annotations:       <none>
Selector:          example=exampleforservice
Type:              ClusterIP
IP Family Policy:  SingleStack
IP Families:       IPv4
IP:                10.97.98.205
IPs:               10.97.98.205
Port:              <unset>  8080/TCP
TargetPort:        80/TCP
Endpoints:         10.0.15.74:80,10.0.18.149:80,10.0.18.73:80
Session Affinity:  None
Events:            <none>
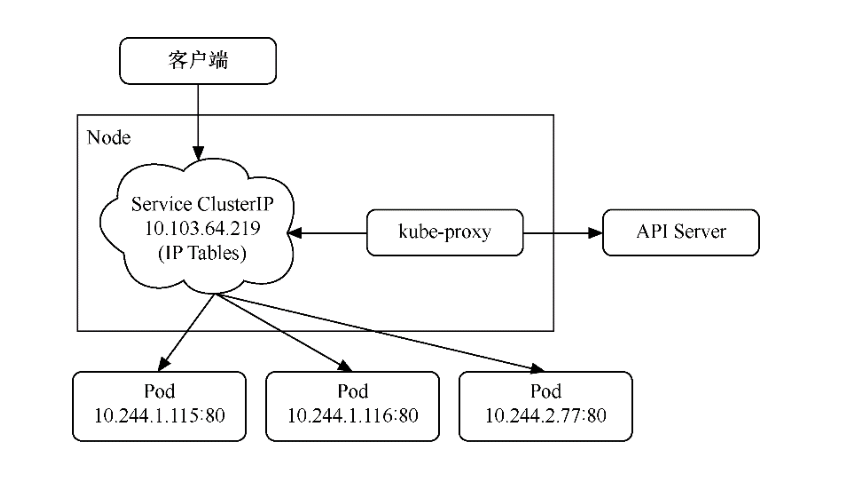
Service访问及负载均衡原理
为什么在给这3个Pod设置了Service以后,就可以实现负载均衡了呢?在每个节点中都有一个叫作kube-proxy的组件,这个组件识别Service和Pod的动态变化,并将变化的地址信息写入本地的IPTables中。而IPTables使用NAT等技术将virtualIP的流量转至Endpoint。默认情况下,Kubernetes使用的是IPTables模式
我们可以进入任意一台Kubernetes机器(Master或者Node),运行以下命令查看IPTables的配置
$ sudo iptables -L -v -n -t nat
kube-proxy底层是修改iptables规则进行的Server和Pod之间的网络数据转发。每个nat表中有server和pod对应的链,可以看到每条链都有对应的数字,表示被转发的概率,这样实现了流量的负载均衡。
我的kubernets集群网络插件使用的Cilium 。
代码开源在 https://github.com/cilium/cilium。
参考:
Cilium 网络概述
https://www.koenli.com/fcdddb4a.html
Cilium 的官方文档
https://docs.cilium.io/en/v1.11/
其他参考文献
1.2 通过NodePort发布
通过NodePort发布的方式基于通过ClusterIP发布的方式,先生成一个ClusterIP,然后将这个虚拟IP地址及端口映射到各个集群机器 (即Master和Node)的指定端口上,这样,Kubernetes集群外部的机器就可以通过“NodeIP:端口”方式访问Service。
examplenode-portservice.yml
kind: Service
apiVersion: v1
metadata:
  name: examplenodeportservice
spec:
  selector:
    example: exampleforservice
  ports:
  - protocol: TCP
    port: 8080
    targetPort: 80
    nodePort: 30001
  type: NodePort
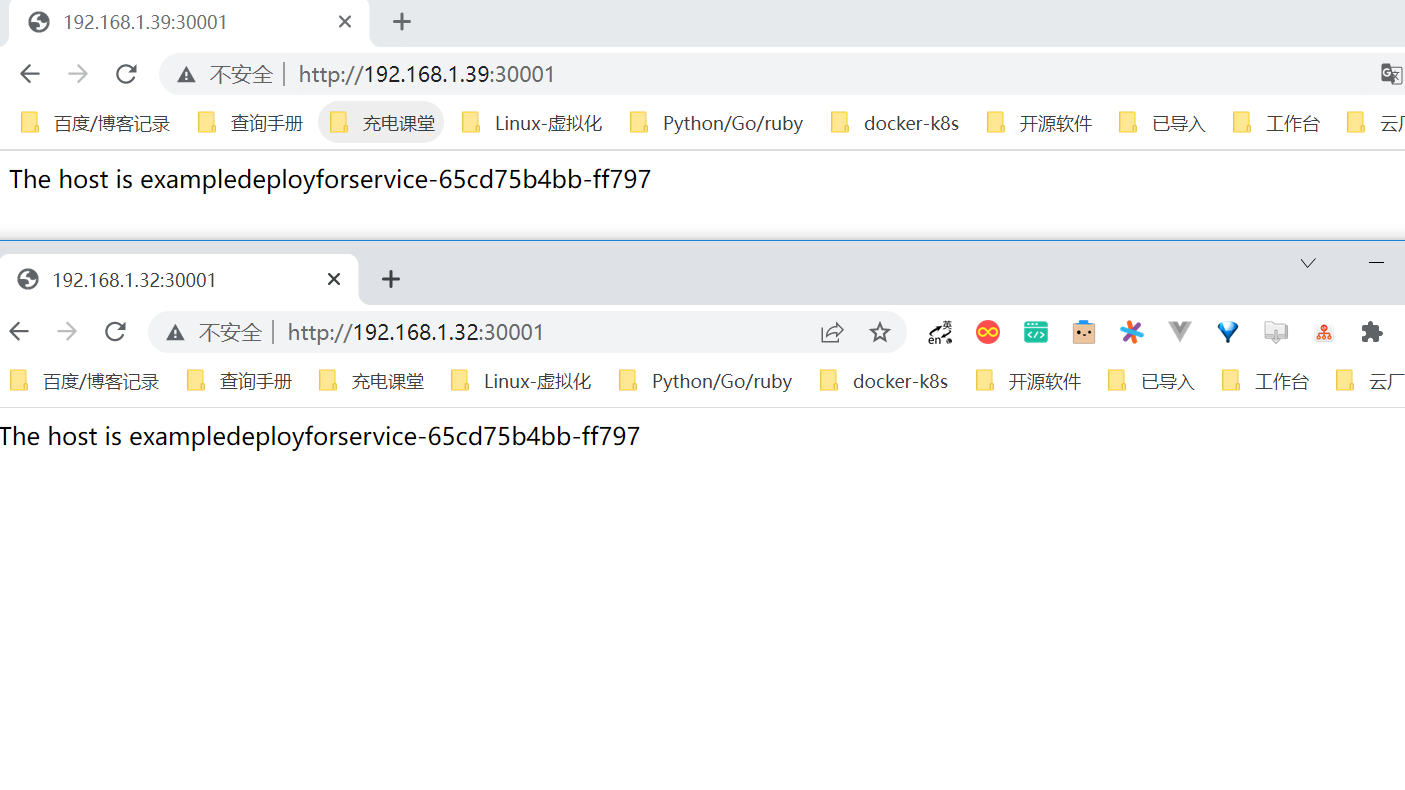
除了更改type属性之外,这里还添加了nodePort: 30001属性,它表示将ClusterIP及port属性(本例中为port:8080)映射到集群中各个机器的30001端口上,这样可以通过“NodeIP:端口”访问Service。
提示:nodeport的取值范围为30000~32767。
运行以下命令,通过模板创建Service。
$ kubectl apply -f examplenode-portservice.yml
service/examplenodeportservice created
Service创建成功后,可以通过以下命令查看Service。
$ kubectl get svc
NAME                     TYPE        CLUSTER-IP       EXTERNAL-IP   PORT(S)          AGE
examplenodeportservice   NodePort    10.111.156.147   <none>        8080:30001/TCP   50m
由于NodePort方式会基于ClusterIP方式,因此在集群内部还是可以通过ClusterIP进行端口访问的。
集群外部直接通过NodeIP:30001访问,现在已经可以通过集群外部的机器使用“NodeIP:端口”方式访问Service了
1.3 通过LoadBalancer发布
LoadBalancer方式基于ClusterIP方式和NodePort方式来创建服务,除此以外,还会申请使用外部负载均衡器,由负载均衡器映射到 各个“NodeIP:端口”上。
这样,Kubernetes集群外部的机器就可以通过负载均衡器访问Service。
以下的yaml示例中,通过设置LoadBalancer映射到云服务商提供的LoadBalancer地址,以请求底层云平台创建一个负载均衡器,并将 每个Node作为后端进行服务分发。该模式需要底层云平台(如GCE)的支持。
apiVersion: v1
kind: Service
metadata:
  name: my-service
spec:
  selector:
    app: MyApp
  ports:
    - protocol: TCP
      port: 80
      targetPort: 9376
      nodePort: 30061
  clusterIP: 10.0.171.12
  loadBalancerIP: 78.11.42.19
  type: loadBalancer
status:
  loadBalancer:
    ingress:
    - ip: 146.147.12.155 #这个是云服务商提供的负载IP
然而,Kubernetes没有为私有集群提供网络负载均衡器(类型为LoadBalancer的Service)的实现。
如果你的Kubernetes集群没有在公有云的IaaS平台(GCP、AWS、Azure等)上运行,则LoadBalancer将在创建时无限期地处于“Pending”状态。
也就是说,只有公有云厂商的Kubernetes支持LoadBalancer。
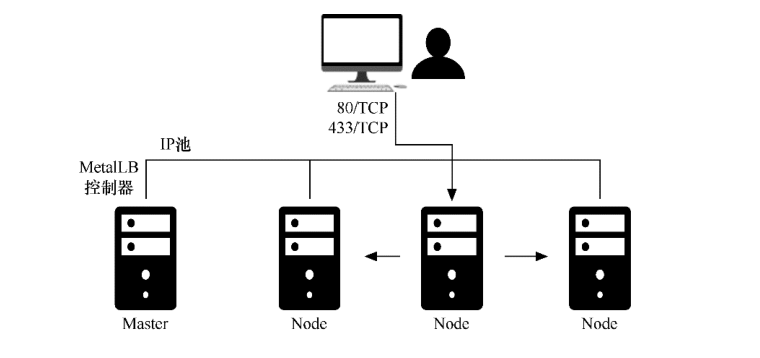
MetalLB实现 Load Balancer 负载均衡
我们使用的是MetalLB,它为不在公有云平台上运行的私有Kubernetes集群提供网络负载均衡器实现,从而有效地在任何集群中使用LoadBalancer Service。
MetalLB官网:https://metallb.org/
相比Traefik而言
Traefik和metallb使用的场景是不一样的,
traefik用在7层的LB
metallb是2/3层的LB
MetalLB会在Kubernetes内运行,监控服务对象的变化。一旦察觉有新的LoadBalancer Service在运行,并且没有可申请的负载均衡器 之后,就会完成以下两部分工作。
地址分配:MetalLB将会把在用户配置的地址池中选取的地址分配给Service。
地址广播:根据不同配置,MetalLB会以二层(ARP/NDP)或者BGP方式进行地址广播
MetalLB的原理
首先,为了安装MetalLB,直接执行以下命令即可。
$ kubectl apply -f https://raw.githubusercontent.com/metallb/metallb/v0.12.1/manifests/namespace.yaml
$ kubectl apply -f https://raw.githubusercontent.com/metallb/metallb/v0.12.1/manifests/metallb.yaml
MetalLB的相关资源都会安装到metallb-system这个命名空间(namespace)下。
配置生效后,可以通过$ kubectl get pods -n metallb-system命令进行查看。
$ kubectl get pods -n metallb-system
其中包含一个名为“controller”的Deployment控制器和一个名为“speaker”的DaemonSet控制器。
 kubectl get pods -n metallb-system
NAME                          READY   STATUS              RESTARTS   AGE
controller-66445f859d-pj6qb   1/1     Running             0          119s
speaker-2q9pk                 1/1     Running             0          119s
speaker-2v5c9                 1/1     Running             0          119s
speaker-4h2kl                 1/1     Running             0          119s
speaker-4h8pf                 1/1     Running             0          119s
speaker-569vp                 1/1     Running             0          119s
speaker-5k9lp                 1/1     Running             0          119s
speaker-5wnjx                 1/1     Running             0          119s
speaker-6k6ts                 1/1     Running             0          119s
speaker-85bgw                 1/1     Running             0          119s
speaker-88v5m                 1/1     Running             0          119s
speaker-8rvqv                 1/1     Running             0          119s
speaker-944wx                 1/1     Running             0          119s
....
然后,还需要创建一个配置文件发送给MetalLB,以提供对应的集群IP地址及相关协议配置。
metallb-config.yaml
编辑地址池,以把自己的集群地址配置进去。
apiVersion: v1
kind: ConfigMap
metadata:
  namespace: metallb-system
  name: config
data:
  config: |
    address-pools:
    - name: default
      protocol: layer2
      addresses:
      - 192.168.1.251-192.168.1.253
      # - 192.168.1.0/28
接下来,执行以下命令,让配置生效。
$ kubectl apply -f metallb-config.yaml
此时,MetalLB的安装与配置就完成了。 为了创建对应的Service,先执行以下命令。
exampleloadbalancerservice.yaml
kind: Service
apiVersion: v1
metadata:
  name: exampleloadbalancerservice
spec:
  selector:
    example: exampleforservice
  ports:
  - protocol: TCP
    port: 8080
    targetPort: 80
  type: LoadBalancer
通过模板创建Service
$ kubectl apply -f exampleloadbalancerservice.yaml
service/exampleloadbalancerservice created
Service创建成功后,可以通过以下命令查看Service。
$ kubectl get service
NAME                         TYPE           CLUSTER-IP     EXTERNAL-IP     PORT(S)          AGE
exampleloadbalancerservice   LoadBalancer   10.108.17.98   192.168.1.251   8080:30982/TCP   2m25s
kubernetes                   ClusterIP      10.96.0.1      <none>          443/TCP          168d
因为LoadBalancer类型的Service也基于ClusterIP(10.108.17.98: 8080)和NodePort(NodeIP:30982),所以也可以通过这两种形式来访问。
对于这个Service,可以通过ClusterIP方式进行访问,也可以通过NodePort方式进行访问。
$ curl 10.108.17.98:8080
<p>The host is exampledeployforservice-65cd75b4bb-4z4rv</p>
通过NodePort方式访问的结果如图
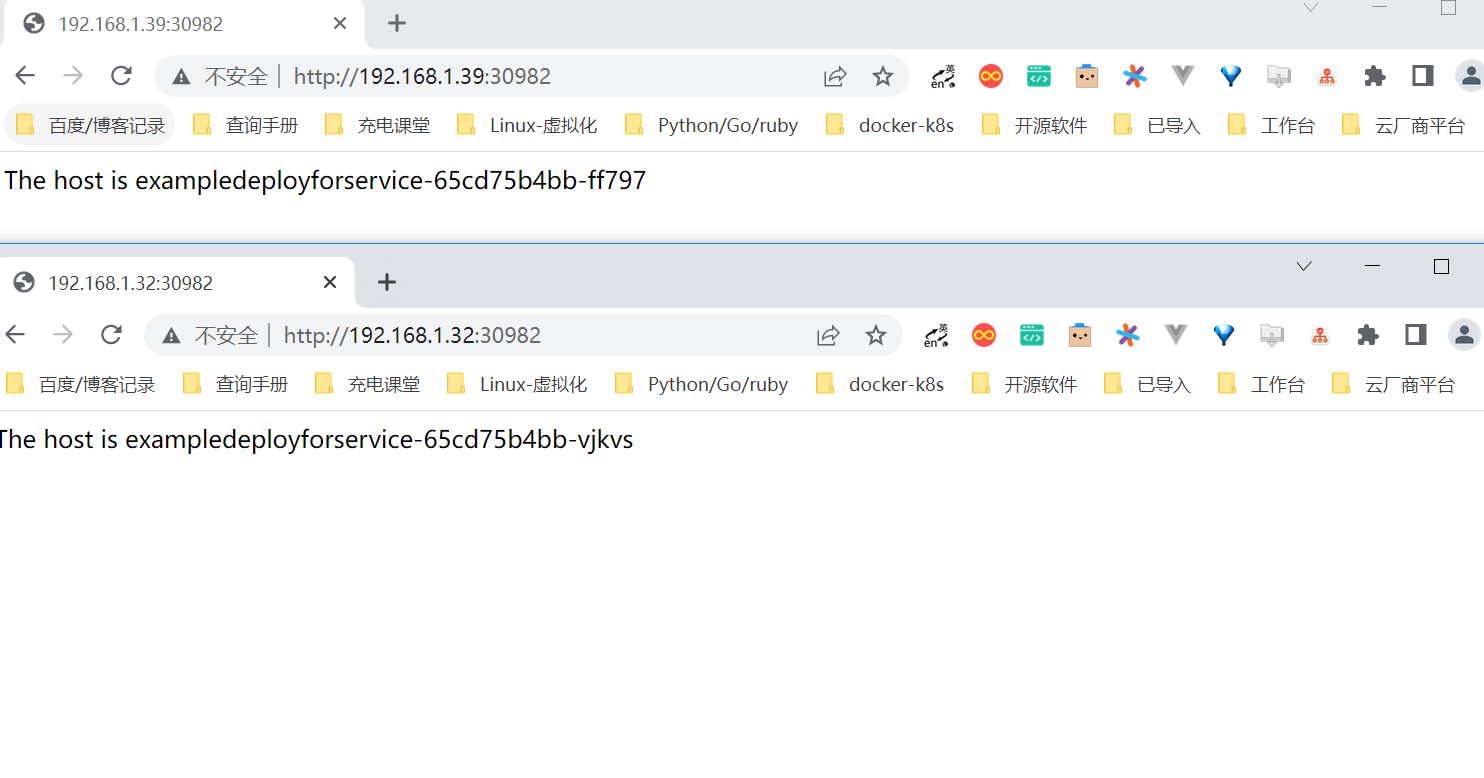
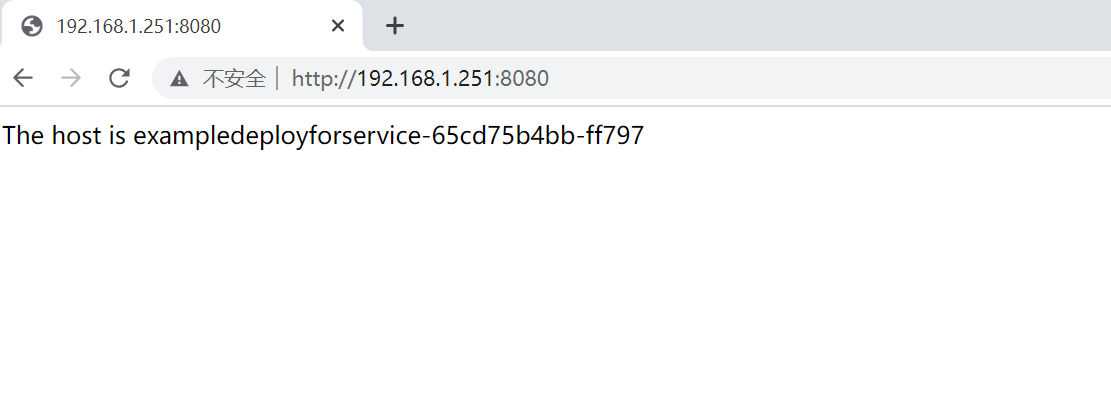
除此之外,Service还有一个EXTERNAL-IP地址,这个IP地址就是LoadBalancer对外的IP地址,可以由外部机器访问。
因为在Service创建时spec.ports.port属性为8080,所以LoadBalancer的端口为8080。
在本例中,因为LoadBalancer的对外IP为192.168.1.251,端口为8080,所以外部机器也可以通过LoadBalancer地址进行访问。打开 浏览器访问192.168.1.251:8080
参考文献
OpenELB实现 Load Balancer 负载均衡
2.2 个向内发布服务方式
2种向内发布的方式分别如下。
ClusterIP-无头Service(headless service):这种方式不会分配ClusterIP地址,也不通过kube-proxy进行反向代理和负载均 衡,而是通过DNS提供稳定的网络ID来进行访问。DNS会将无头Service的后端直接解析为Pod的IP地址列表。这种类型的Service 只能在集群内的Pod中访问,集群中的机器无法直接访问。这种方式主要供StatefulSet使用。
ExternalName:和上面提到的3种向外发布的方式不太一样,在那3种方式中都将Kubernetes集群内部的服务发布出去,而ExternalName则将外部服务引入进来,通过一定格式映射到Kubernetes集群,从而为集群内部提供服务。
2.1 通过无头Service
无头Service(headless service)是一种特殊的Service类型。
通过无头Service发布,不会分配任何ClusterIP地址,也不通过kube-proxy进行反向代理和负载均衡。
无头Service是通过DNS提供稳定的网络ID来进行访问的,DNS会将无头Service的后端直接解析为Pod的IP地址列表,通过标签选择器将后端的Pod列表返回给调用的客户端。
这种类型的Service只能在集群内的Pod中访问,集群内的机器(即Master和Node)无法直接访问,集群外的机器也无法访问。
无头Service主要供StatefulSet使用。
因为无头Service不提供负载均衡功能,也没有单独的Service IP地址,所以开发人员可以自己控制负载均衡策略,降低与Kubernetes 系统的耦合性。
exampledeployforservice.yml
apiVersion: apps/v1
kind: Deployment
metadata:
  name: exampledeployforservice
spec:
  replicas: 3
  selector:
    matchLabels:
      example: exampleforservice
  template:
    metadata:
      labels:
        example: exampleforservice
    spec:
      containers:
      - name: pythonservice
        image: python:3.7
        imagePullPolicy: IfNotPresent
        command: ['sh', '-c']
        args: ['echo "<p>The host is $(hostname)</p>" > index.html; python -m http.server 80']
        ports:
        - name: http
          containerPort: 80
exampleheadlessservice.yml
kind: Service
apiVersion: v1
metadata:
  name: exampleheadlessservice
spec:
  selector:
    example: exampleforservice
  clusterIP: None
  ports:
    - protocol: TCP
      port: 8080
      targetPort: 80
  type: ClusterIP
和上一个示例不同的是,这里指定了一个属性clusterIP:None,它表示不分配任何虚拟IP地址。
$ kubectl apply -f exampleheadlessservice.yml
$ kubectl get service
NAME                     TYPE        CLUSTER-IP   EXTERNAL-IP   PORT(S)    AGE
exampleheadlessservice   ClusterIP   None         <none>        8080/TCP   49s
相对于上一个示例中创建的Service,无头Service的CLUSTER-IP属性为None,即无法通过IP地址访问。
由于这个Service无法由集群内外的机器直接访问,因此只能由Pod访问,而且需要通过DNS形式进行访问。
具体访问形式为{ServiceName}.{Namespace}.svc.{ClusterDomain},
其中svc是Service的缩写(固定格式);
ClusterDomain表示集群域,本例中默认的集群域为cluster.local;
前面两段文字则是根据Service定义决定的,这个例子中ServiceName为exampleheadlessservice,
而Namespace没有在yml文件中指定,默认值为Default。
为了访问这个地址,先创建一个测试用的Pod,用它来尝试访问Service。命令如下。
examplepodforheadlessservice.yml
apiVersion: v1
kind: Pod
metadata:
  name: examplepodforheadlessservice
spec:
  containers:
  - name: testcontainer
    image: docker.io/appropriate/curl
    imagePullPolicy: IfNotPresent
    command: ['sh', '-c']
    args: ['echo "test pod for headless service!"; sleep 3600']
这个Pod并没有什么特别之处,其镜像为appropriate/curl。该Pod是一种工具箱,里面存放了一些测试网络和DNS使用的工具(例 如,curl和nslookup等),正好用于测试现在的Service。执行sleep 3600命令,可让该容器长期处于运行状态。
$ kubectl apply -f examplepodforheadlessservice.yml
进入容器内部后,可以执行nslookup命令查询DNS信息,获得DNS下面的IP列表。
之前已经提到,Kubernetes中的DNS资源访问方式为{ServiceName}.{Namespace}.svc. {ClusterDomain},
所以本例中的具体命令如下。
$ kubectl exec -ti examplepodforheadlessservice -- /bin/sh
/ # nslookup exampleheadlessservice.default.svc.cluster.local
nslookup: can't resolve '(null)': Name does not resolve

Name:      exampleheadlessservice.default.svc.cluster.local
Address 1: 10.0.32.186 10-0-32-186.exampleheadlessservice.default.svc.cluster.local
Address 2: 10.0.23.137 10-0-23-137.exampleheadlessservice.default.svc.cluster.local
Address 3: 10.0.36.243 10-0-36-243.exampleheadlessservice.default.svc.cluster.local
可以通过crul命令来测试可访问性。执行以下命令测试是否可以访问Pod上的Web服务。
可以看到,Pod上的Web服务可以成功访问。
/ # curl exampleheadlessservice.default.svc.cluster.local
<p>The host is exampledeployforservice-65cd75b4bb-wljkl</p>

/ # curl exampleheadlessservice.default.svc.cluster.local
<p>The host is exampledeployforservice-65cd75b4bb-pfcwm</p>

# 如果在同一个名称空间下,还可以用如下方式访问
/ # curl exampleheadlessservice
除了直接调用该域名访问服务之外,还可以通过解析域名并根据自定义需求来决定具体要访问哪个Pod的ID地址。
这种方式更适用于由StatefulSet产生的有状态Pod。
2.2 通过ExternalName
向外发布方式都将Kubernetes集群内部的服务发布出去,而ExternalName恰恰相反,将外部服务引入进来,通过一定格式映射到Kubernetes集群,从而为集群内部提供服务。
也就是说,ExternalName类型的Service没有选择器,也没有定义任何的端口和端点。
相反,对于运行在集群外部的服务,通过返回外部服务别名这种方式来提供服务。
exampleexternalnameservice.yml
apiVersion: v1
kind: Service
metadata:
  name: exampleexternalnameservice
spec:
  type: ExternalName
  externalName: www.baidu.com
ExternalName类型的Service所需要的属性很简单,只需要指定type,并通过ExternalName引入外部服务的地址即可,这里直接将百 度的网址引入进来。
运行以下命令,通过模板创建Service。
$ kubectl apply -f exampleexternalnameservice.yml
Service创建成功后,可以通过以下命令查看Service。
$ kubectl get service
NAME                         TYPE           CLUSTER-IP   EXTERNAL-IP     PORT(S)   AGE
exampleexternalnameservice   ExternalName   <none>       www.baidu.com   <none>    37s
可以看到,这个Service非常特殊,没有CLUSTER-IP,就像无头Service一样,同时也没有对应的PORT(S)。
由于该Service和无头Service类似,因此如果需要访问,需要在Pod内通过DNS解析方式进行访问。
我们已经创建了一个专门用于测试Service的Pod,现在继续使用它,通过以下命令进入Pod内部,在Pod内部执行命令行。
$ kubectl exec -ti examplepodforheadlessservice -- /bin/sh

## 一共解析出两个IP地址。其具体访问方式和无头Service几乎一致
/ # nslookup exampleexternalnameservice.default.svc.cluster.local
nslookup: can't resolve '(null)': Name does not resolve


Name:      exampleexternalnameservice.default.svc.cluster.local
Address 1: 14.215.177.39
Address 2: 14.215.177.38

#这两个IP地址其实就是百度的访问地址,可以发现解析出的IP地址和上面是一样的
/ # nslookup www.baidu.com
nslookup: can't resolve '(null)': Name does not resolve

Name:      www.baidu.com
Address 1: 14.215.177.39
Address 2: 14.215.177.38
3. 服务发现
Kubernetes支持两种基本的服务发现模式—通过环境变量和通过DNS。通过这两种方式,可以在Pod中发现这些服务。
3.1 环境变量
在配置的这些环境变量中,{ServiceName}_SERVICE_HOST和
{ServiceName}_ SERVICE_PORT格式的变量表示KubernetesService的环境变量({ServiceName}全转换为大写,横线转换为下
划线),而其他类型格式则是Docker Link形式的环境变量。
之前我们已经创建了专用于测试Service的Pod,可以通过以下命令进入Pod内部,以便在Pod内执行命令行。
$ kubectl exec -ti examplepodforheadlessservice -- /bin/sh
进入Pod后,执行以下命令。
$ printenv | grep EXAMPLE
该命令的作用是查询所带“EXAMPLE”关键字的环境变量,之前我们所创建的所有Service都有这个前缀。
这种方式存在一定的局限性。它要求按一定的顺序执行,即先创建Service,之后创建的Pod才会有这些环境变量,否则环境变量不会
有值(除非重启)。
除此以外,还要求Service和Pod在同一命名空间中,其他命名空间中的变量不会配置到Pod中。
3.2 DNS
Kubernetes网络中常见四种通信方式
同一个pod的内部通信;
各个pod彼此通信;
pod和service的通信;
集群外部流向service的通信。
看到上面这些你就不难理解为什么在yaml中存在port,targetPort,nodePort?
Service本身有端口、Pod也有端口、容器也有端口,之间有什么关系呢?
containerPort:一个信息性数据,他只是为集群提供一个可以快速了解相关pod可以访问端口的途径,而且显式指定容器端口,无论你是否指定都不影响其他节点上的客户端pod对其进行访问。
port:服务提供端口,用于kubernetes集群内部服务访问。
targetPort:pod目标端口,如果不设置使用默认port端口,port和nodePort的数据通过这个端口进入到Pod内部,Pod里面的containers的端口映射到这个端口,提供服务。
nodePort:外部用户访问端口
其具体格式如下。
{ServiceName}.{Namespace}.svc.{ClusterDomain}
各个动态字段的配置说明如下。
ServiceName:创建Service时的Name属性。
Namespace:创建Service时的Namespace属性,如果没有设置,默认值为Default。
ClusterDomain:集群的域名,默认的集群域为cluster.local。
对于普通Service和无头Service,DNS的解析会略有区别。
1.无头Service
在解析DNS时,会直接将其解析为相关Pod的IP地址及Pod域名列表,以便客户端通过自己的规则动态地使用这些地址
$ kubectl exec -ti examplepodforheadlessservice -- /bin/sh
/ # nslookup exampleheadlessservice.default.svc.cluster.local
nslookup: can't resolve '(null)': Name does not resolve

Name:      exampleheadlessservice.default.svc.cluster.local
Address 1: 10.0.32.186 10-0-32-186.exampleheadlessservice.default.svc.cluster.local
Address 2: 10.0.23.137 10-0-23-137.exampleheadlessservice.default.svc.cluster.local
Address 3: 10.0.36.243 10-0-36-243.exampleheadlessservice.default.svc.cluster.local
2.普通Service
在解析DNS时会将其解析为Service的ClusterIP地址,不会直接获取Pod的各个地址.
$ kubectl apply -f exampleclusteripservice.yml

$ kubectl get service
NAME                      TYPE        CLUSTER-IP      EXTERNAL-IP   PORT(S)    AGE
exampleclusteripservice   ClusterIP   10.109.135.25   <none>        8080/TCP   3s
kubernetes                ClusterIP   10.96.0.1       <none>        443/TCP    171d

$ kubectl apply -f examplepodforheadlessservice.yml

$ kubectl exec -ti examplepodforheadlessservice -- /bin/sh
/ # nslookup exampleclusteripservice.default.svc.cluster.local
nslookup: can't resolve '(null)': Name does not resolve

Name:      exampleclusteripservice.default.svc.cluster.local
Address 1: 10.109.135.25 exampleclusteripservice.default.svc.cluster.local
4.其他配置方式
4.1 未设置选择器的Service
Service是对Pod进行访问时最常用的抽象,还可以在以下情况下抽象其他类型的后端。
如果希望在生产环境中使用外部数据库,但在测试环境中使用自己的数据库。
将服务指向不同命名空间下的服务,或者其他集群中的服务。
正在做Kubernetes迁移,计划将一部分工作负载迁移到Kubernetes,但现在正在评估,只打算先运行一部分。
在这些情况下,都可以使用没有设置选择器的Service,并自定义Endpoint类型。
examplenoselectorservice.yml
kind: Service
apiVersion: v1
metadata:
  name: examplenoselectorservice
spec:
  ports:
    - protocol: TCP
      port: 8080
      targetPort: 80
可以发现,这个Service里面没有关于选择器的配置,无法与Pod产生关联。
运行以下命令,通过模板创建Service。
$ kubectl apply -f examplenoselectorservice.yml
Service创建成功后,可以通过以下命令查看Service。
$ kubectl get service
NAME                       TYPE        CLUSTER-IP     EXTERNAL-IP   PORT(S)    AGE
examplenoselectorservice   ClusterIP   10.99.109.46   <none>        8080/TCP   21s
此时,可以使用$ kubectl describe service examplenoselectorservice命令查看Service的详细信息。可以
发现此时Endpoints属性为<none>,即没有任何设置
$ kubectl describe service examplenoselectorservice
Name:              examplenoselectorservice
Namespace:         default
Labels:            <none>
Annotations:       <none>
Selector:          <none>
Type:              ClusterIP
IP Family Policy:  SingleStack
IP Families:       IPv4
IP:                10.99.109.46
IPs:               10.99.109.46
Port:              <unset>  8080/TCP
TargetPort:        80/TCP
Endpoints:         <none>
如果此时通过ClusterIP与端口方式访问Service,可以发现无法连接,
$ curl 10.99.109.46:8080
curl: (7) Failed connect to 10.99.109.46:8080; Connection timed out
接着,创建Endpoints,让它与刚才创建的Service产生关联。
接下来,通过$ vim examplenoselectorendpoint.yml命令创建模板文件。
$ kubectl get pod -o wide
NAME                                 READY   STATUS    RESTARTS   AGE   IP            NODE            NOMINATED NODE   READINESS GATES
exampledeployment-656c6d8f4c-lww4h   1/1     Running   0          75s   10.0.36.160   gitee-k8s-w08   <none>           <none>
kind: Endpoints
apiVersion: v1
metadata:
  name: examplenoselectorservice
subsets:
  - addresses:
    - ip: 10.0.36.160
    ports:
    - port: 80
这里的IP地址和port可以设置为Kubernetes集群内Pod的IP地址和端口,也可以是Node的IP地址和端口,甚至可以配置成外部集群或外 网的IP地址和端口。
这非常灵活,可根据需要配置。这里配置的是10.0.36.160,是一个nginx的容器的IP地址。
注意,这里Endpoints的name属性需要和Service保持一致,否则无法关联。在本例中,它们的名称都是examplenoselectorservice。
运行以下命令,通过模板创建Endpoints。
$ kubectl apply -f examplenoselectorendpoint.yml
此时再使用kubectl describe service examplenoselectorservice命令,查看Service的详细信息,可
以发现此时Endpoints已经有信息了,其值为10.0.36.160:80
$ kubectl describe service examplenoselectorservice
Name:              examplenoselectorservice
Namespace:         default
Labels:            <none>
Annotations:       <none>
Selector:          <none>
Type:              ClusterIP
IP Family Policy:  SingleStack
IP Families:       IPv4
IP:                10.99.109.46
IPs:               10.99.109.46
Port:              <unset>  8080/TCP
TargetPort:        80/TCP
Endpoints:         10.0.36.160:80
此时如果再通过ClusterIP加端口的方式访问Service,可以看到已经成功访问Pod提供的服务。
$ curl 10.99.109.46:8080
<!DOCTYPE html>
<html>
<head>
<title>Welcome to nginx!</title>
....
4.2 配置外部IP地址
externalIPs 通过svc创建,在指定的node上监听端口
如果要让Kubernetes集群之外的机器访问集群内部的服务,另一种方式是配置外部IP地址。
Kubernetes的Service会由externalIP地址发布出去,这样集群之外的机器就可以通过这个外部IP地址来访问Service。
externalIP可以用在任何类型的发布方式(即ClusterIP、NodePort、LoadBalancer、External Name)中。
举例说明
nginxdeployment.yaml
apiVersion: apps/v1
kind: Deployment
metadata:
  name: exampledeployment
spec:
  replicas: 1
  selector:
    matchLabels:
      example: deploymentfornginx
  template:
    metadata:
      labels:
        example: deploymentfornginx
    spec:
      containers:
      - name: nginx
        image: nginx:1.7.9
        ports:
        - containerPort: 80[
exampleexternalipservice.yml
kind: Service
apiVersion: v1
metadata:
  name: exampleexternalipservice
spec:
  selector:
    example: deploymentfornginx
  ports:
    - protocol: TCP
      port: 8081
      targetPort: 80
  externalIPs:
    - 192.168.1.80
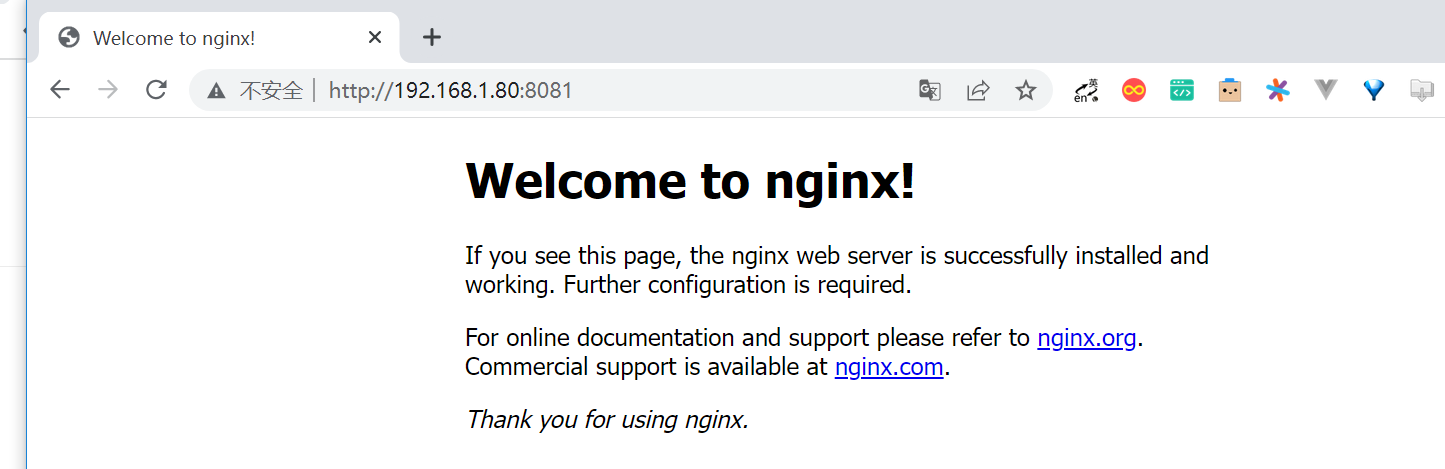
这个Service其实就是简单的ClusterIP Service,Pod端口为80,而向外映射的端口为8081,这个端口会同时映射到ClusterIP和 externalIP。我们设置的外部IP地址为192.168.1.80,集群外的机器可以通过这个地址访问集群内的服务。
注意:externalIPs 是一个node节点的IP,NodePort是发布所有的Node的服务,externalIPs 是发布单个Node的服务
适用场景: 想通过svc来负载,但要求某台指定的node上监听,而非像nodeport所有节点监听
$ kubectl apply -f nginxdeployment.yaml
$ kubectl apply -f exampleexternalipservice.yml
Service创建成功后,可以通过以下命令查看Service。
$ kubectl get service
NAME                       TYPE        CLUSTER-IP       EXTERNAL-IP     PORT(S)    AGE
exampleexternalipservice   ClusterIP   10.107.200.177   192.168.1.101   8081/TCP   48s

$ kubectl describe service exampleexternalipservice
....
Endpoints:         10.0.36.190:80
可以看到这里多了EXTERNAL-IP属性,它正是我们设置的地址。
在集群之外的机器上,通过“外部IP地址:端口”,就可以访问Pod中的服务。
从外部机器访问的结果