Contents
Helm简化Kubernetes部署
Helm是Kubernetes生态系统中的一个软件包管理工具,有点类似于Linux操作系统里面的“apt-get”和“yum”。
对Kubernetes集群进行部署应用时,我们将面临以下问题:
如何管理、编辑和更新这些分散的Kubernetes应用配置文件。
如何把一套相关的配置文件作为一个应用进行管理。
如何分发和重用Kubernetes的应用配置。
Helm的出现就是为了很好地解决上面这些问题。Helm Chart是用来封装Kubernetes原生应用程序的一系列YAML文件。我们可以在部署应用的时候自定义应用程序的一些Metadata,以便于应用程序的分发。
对于应用发布者而言,可以通过Helm打包应用、管理应用依赖关系、管理应用版本并发布应用到软件仓库。
对于使用者而言,使用Helm后不需要编写复杂的应用部署文件,可以以简单的方式在Kubernetes上查找、安装、升级、回滚、卸载应用程序。
总之,Helm大大简化了应用管理的难度,其主要有以下优点:
● 管理复杂应用,Charts能够描述哪怕是最复杂的程序结构,其提供了可重复使用的应用安装的定义。
● 易于更新升级,使用就地升级和自定义钩子来解决更新的难题。
● 易于共享。Charts无论是在私有服务器还是公共服务器上,都非常易于升级、共享和托管。
● 轻松回滚,可使用“helm rollback”命令轻松实现快速回滚。
Helm基础
Helm
Helm是一个命令行下的客户端工具,主要用于Kubernetes应用程序Chart的创建、打包、发布以及创建和管理本地和远程的Chart仓库。
Tiller
Tiller是Helm的服务端,部署在Kubernetes集群中。Tiller用于接收Helm的请求,并根据Chart生成Kubernetes的部署文件(Helm称为Release),然后提交给Kubernetes创建应用。Tiller还提供了Release的升级、删除、回滚等一系列功能。
Chart
Helm的软件包,采用TAR格式,类似于APT的DEB包或者YUM的RPM包,其包含了一组定义Kubernetes资源相关的YAML文件。
Repository
Helm的软件仓库,保存了一系列的Chart软件包,以供用户下载;并且提供了一个该Repository的Chart包清单文件,以供用户查询。Helm可以同时管理多个不同的Repository。
Config
应用程序实例化部署运行时的配置信息。
Release
使用helm install命令在Kubernetes集群中部署的Chart称为Release。Helm中提到的Release和我们通常概念中的版本有所不同,这里的Release可以理解为Helm使用Chart包部署的一个应用实例。在同一个集群中,一个Chart可以使用不同的配置(Config)安装多次,每次安装都会创建一个Release。
Helm 3 v3 变化
2019 年 11 月 13 日, Helm 团队发布 Helm v3 的第一个稳定版本。 该版本主要变化如下: 架构变化:
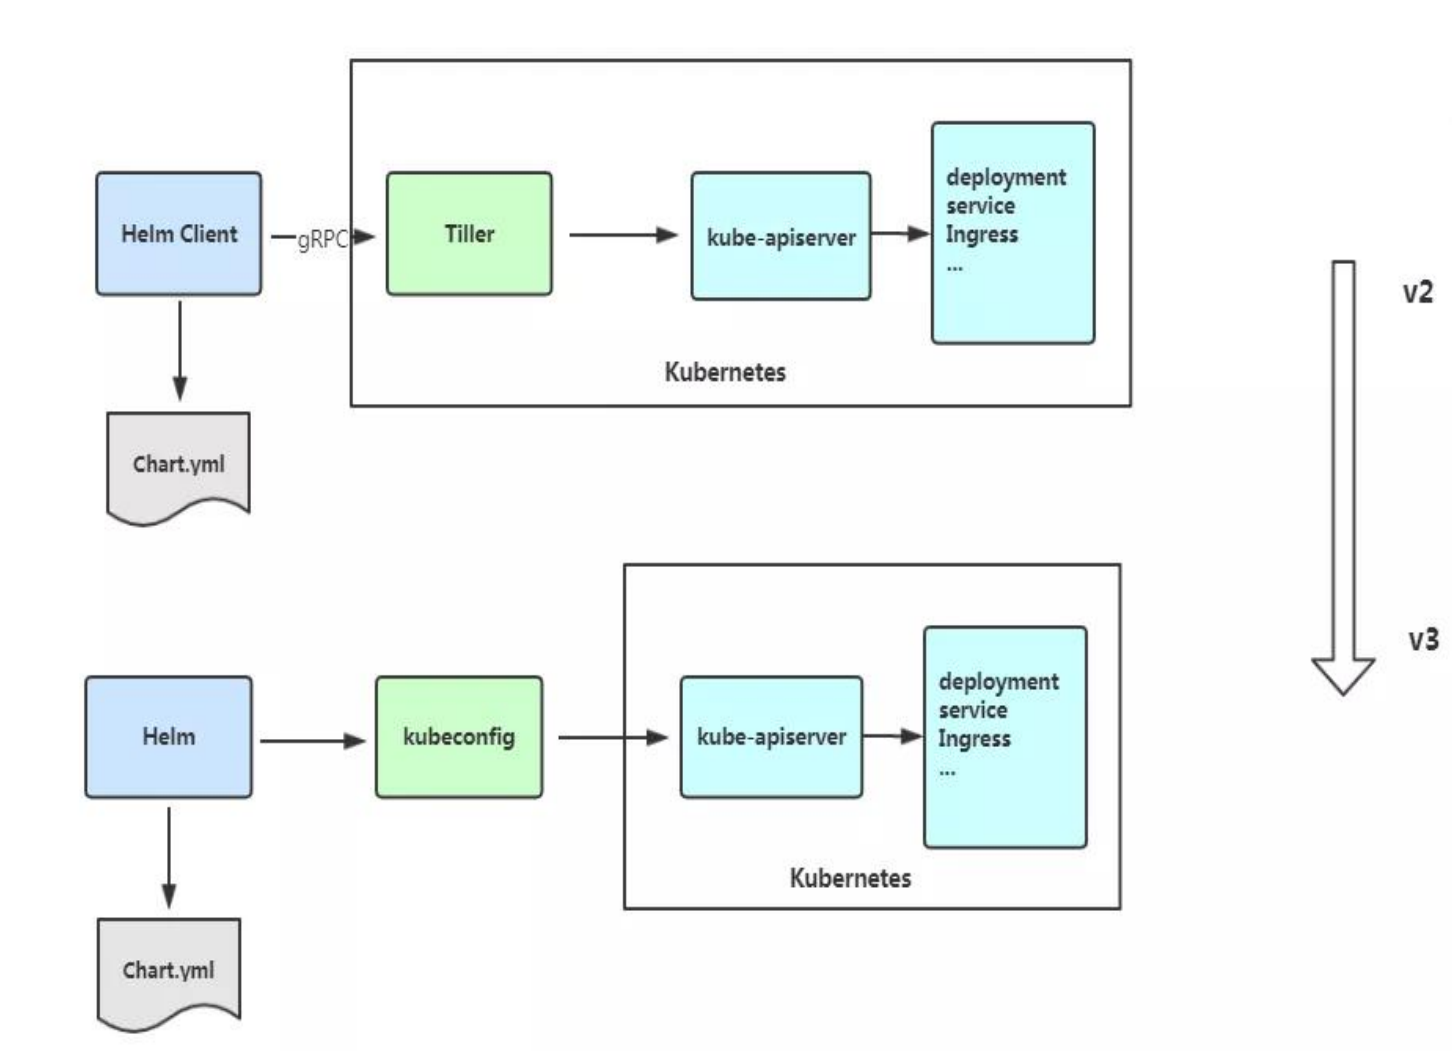
最明显的变化是 Tiller 的删除
Release 名称可以在不同命名空间重用
支持将 Chart 推送至 Docker 镜像仓库中
使用 JSONSchema 验证 chart values
其他
Helm的核心术语
Helm将Kubernetes应用的相关配置组织为Charts,并通过它完成应用的常规管理操作。通常来说,使用Charts管理应用的流程包括从0开始创建Charts、将Charts及其相关的文件打包为归档格式、将Charts存储于仓库(repository)中并与之交互、在Kubernetes集群中安装或卸载Charts以及管理经Helm安装的应用的版本发行周期。因此,对Helm来说,它具有以下几个关键概念。
·Charts:即一个Helm程序包,它包含了运行一个Kubernetes应用所需要的镜像、依赖关系和资源定义等,必要时还会包含Service的定义;它类似于APT的dpkg文件或者yum的rpm文件。

·Repository:Charts仓库,用于集中存储和分发Charts,类似于Perl的CPAN,或者Python的PyPI。

·Config:应用程序实例化安装运行时使用的配置信息。

·Release:应用程序实例化配置后运行于Kubernetes集群中的一个Charts实例;在同一个集群上,一个Charts可以使用不同的Config重复安装多次,每次安装都会创建一个新的Release。
Helm 3快速入门
Helm的版本v2和版本v3目前处于维护当中,考虑了轻量、安全等特性,这里选择只介绍较新的版本v3的部署和使用,版本v2需要额外部署Tiller,而客户端的使用方法大多数都与版本v3相同。
Helm的每个发行版都提供了主流操作系统的专用版本,主要包括Linux、Mac OS和Windows,用户安装前按需下载合用的平台上的相关发行版本即可。
Helm项目托管在GitHub之上,项目地址为https://github.com/kubernetes/helm 。
安装
安装方式1
下载最新的helm 3安装脚本
curl -fsSL -o get_helm.sh https://raw.githubusercontent.com/helm/helm/master/scripts/get-helm-3
赋权并执行
chmod 700 get_helm.sh && sh get_helm.sh
通过执行helm命令来验证helm安装。
helm
增加一个公有稳定版的helm的repo仓库
helm repo add stable https://kubernetes.oss-cn-hangzhou.aliyuncs.com/charts
让我们安装稳定的nginx 图表并测试设置
helm install nginx stable/nginx-ingress
列出已安装的helm 图表
helm ls
安装方式2
安装helm-v3
使用一条命令安装helm
curl -L https://git.io/get_helm.sh | bash
如果安装包无法下载,可以复制脚本输出的下载链接手动下载,然后解压复制到bin目录,如下所示:
Helm 客户端下载地址:https://github.com/helm/helm/releases 解压移动到/usr/bin/目录即可。
wget https://get.helm.sh/helm-vv3.2.1-linux-amd64.tar.gz
tar zxvf helm-v3.2.1-linux-amd64.tar.gz
mv linux-amd64/helm /usr/bin/
设置helm自动补全
echo "source <(helm completion bash)" >>  ~/.bash_profile
source  ~/.bash_profile
查看Charts仓库信息
[root@ci-base home]# helm repo list
NAME            URL
ingress-nginx   https://kubernetes.github.io/ingress-nginx
stable          http://mirror.azure.cn/kubernetes/charts
aliyun          https://kubernetes.oss-cn-hangzhou.aliyuncs.com/charts
常见操作
4.2 配置国内 t chart 仓库
微软仓库(http://mirror.azure.cn/kubernetes/charts/)这个仓库推荐,基本上官网有的 chart 这里都有。
阿里云仓库(https://kubernetes.oss-cn-hangzhou.aliyuncs.com/charts )
官方仓库(https://hub.kubeapps.com/charts/incubator)官方 chart 仓库,国内有点不好使。
#添加存储库
helm repo add stable http://mirror.azure.cn/kubernetes/charts
helm repo add aliyun https://kubernetes.oss-cn-hangzhou.aliyuncs.com/charts
helm repo update
#查看配置的存储库
helm repo list
helm search repo stable
#删除存储库:
helm repo remove aliyun
# 列出stable仓库中维护的所有Charts的列表
helm search repo
# 列出复合条件的Charts,过滤器查找
helm search repo redis
helm ls --all-namespaces
# 查看Charts的详细信息
[root@ci-base k8s_yaml]# helm show chart stable/redis
apiVersion: v1
appVersion: 4.0.8
description: Open source, advanced key-value store. It is often referred to as a data
structure server since keys can contain strings, hashes, lists, sets and sorted
sets.
home: http://redis.io/
icon: https://bitnami.com/assets/stacks/redis/img/redis-stack-220x234.png
keywords:
- redis
- keyvalue
- database
maintainers:
- email: containers@bitnami.com
name: bitnami-bot
name: redis
sources:
- https://github.com/bitnami/bitnami-docker-redis
version: 1.1.15
[root@ci-base home]# helm inspect chart stable/redis
apiVersion: v1
appVersion: 5.0.7
deprecated: true
description: DEPRECATED Open source, advanced key-value store. It is often referred
to as a data structure server since keys can contain strings, hashes, lists, sets
and sorted sets.
home: http://redis.io/
icon: https://bitnami.com/assets/stacks/redis/img/redis-stack-220x234.png
keywords:
- redis
- keyvalue
- database
name: redis
sources:
- https://github.com/bitnami/bitnami-docker-redis
version: 10.5.7
#查看发布状态
# helm list
安装stable/redis在ns=redis中
//创建
helm search repo redis
kubectl create namespace redis
helm install chart stable/redis -n redis --dry-run
helm install chart stable/redis -n redis

Helm支持四种安装方法:

(1)安装仓库中的chart,例如helm install stable/nginx。

(2)通过tar包安装,例如helm install ./nginx-1.2.3.tgz。

(3)通过chart本地目录安装,例如helm install ./nginx。

(4)通过URL安装,例如helm install https://example.com/charts/nginx-1.2.3.tgz。


//查看创建的charts,查看所有ns
[root@ci-base home]# helm list --all-namespaces
NAME            NAMESPACE       REVISION        UPDATED                                 STATUS          CHART                   APP VERSION
chart           redis           1               2020-11-13 15:11:53.740004087 +0800 CST deployed        redis-10.5.7            5.0.7

//查看单个ns
[root@ci-base ~]# helm list -n ci-gitee-10523


//删除命名空间中的chart
[root@ci-base home]# helm -n redis uninstall chart
release "chart" uninstalled

[root@ci-base home]# helm list -A
NAME            NAMESPACE       REVISION        UPDATED                                 STATUS          CHART                   APP VERSION
# 安装stable/redis

//创建
[root@ci-base home]# helm install redis stable/redis

//指定value.yaml文件创建
helm install -f 12705values.yaml -n ci-gitee-12705 ci-gitee-12705 ./


//查看
[root@ci-base home]# helm list
NAME    NAMESPACE       REVISION        UPDATED                                 STATUS          CHART           APP VERSION
redis   default         1               2020-11-13 15:24:01.368251708 +0800 CST deployed        redis-10.5.7    5.0.7


//删除
[root@ci-base home]# helm uninstall redis
或者使用delete

[root@ci-base home]# helm delete redis
release "redis" uninstalled

[root@ci-base home]# helm list


# 回滚
helm rollback
//命令格式:
helm rollback <RELEASE> [REVISION] [flags]
[aiops@3 test]$ helm rollback helloworld 1


# 升级
helm upgrade

//命令语法:
helm uninstall RELEASE_NAME [flags]

# 获取指定Release变更历史
helm history

//获取某个release历史的安装更新记录
$ helm history helloworld


# helm pull
//从chart仓库中下载打包好的chart到本地存储
[aiops@3 test]$ helm pull stable/mysql
helm包检查项目
# helm包检查项目
[root@ci-base ~]# helm list --all-namespaces

// 查看Config-Map
[root@ci-base ~]# kubectl get cm -n ci-gitee-10523

// 查看Deployment
[root@ci-base ~]# kubectl get Deployment -n ci-gitee-10523

// 查看service
[root@ci-base ~]# kubectl get svc -n ci-gitee-10523

// 查看ingress
[root@ci-base ~]# kubectl get Ingress -n ci-gitee-10523

// 查看pod
[root@ci-base ~]# kubectl get pod -n ci-gitee-10523

// 查看ReplicaSet
[root@k8s-master ~]# kubectl get rs -lapp=demo

[root@k8s-master ~]# kubectl get rs -lapp=demo --show-labels
NAME                         DESIRED   CURRENT   READY   AGE   LABELS
demo-deployment-68b59dd5b8   2         2         2       73m   app=demo,pod-template-hash=68b59dd5b8


# 查看资源信息
// 查看pod里面的容器
kubectl describe -n dev pod cigiteebe-7c5b7486c-pc22z
Helm安装和卸载
# helm安装和卸载
[root@ci-base home]# helm install myapp --debug ./mychart --set service.type=NodePort
[root@ci-base home]# helm uninstall myapp


[root@ci-base home]# helm uninstall chart
[root@ci-base home]# helm list


# 删除命名空间ci-gitee-11856中的chart
helm uninstall -n ci-gitee-11856 ci-gitee-11856


#删除命名空间dev中的chart
helm uninstall -n dev dev


正确姿势
1、brew install helm
2、helm repo add stable http://mirror.azure.cn/kubernetes/charts/
3、helm repo update
4、helm install stable/xxx


helm install --name myapp --dry-run --debug ./mychart --set service.type=NodePort
helm install --name myapp --debug ./mychart --set service.type=NodePort
使用Helm部署Demo
事实上,一个单独的Charts既能用于部署简单应用,例如一个memcached Pod,也能部署复杂的应用,如由HTTP服务器、DB服务器、Cache服务器和应用程序服务器等共同组成的Web应用栈。
接下来我们基于以上认知和Demo配置来进行部署,流程如图
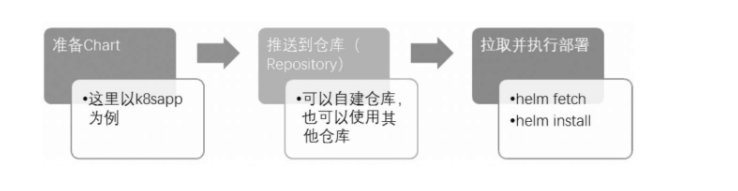
chart 的基本结构
[root@ci-base helm]# helm create test
Creating test

[root@ci-base helm]# tree test/ -L 3
test/
├── charts
├── Chart.yaml
├── templates
│    ├── deployment.yaml
│    ├── _helpers.tpl
│    ├── hpa.yaml
│    ├── ingress.yaml
│    ├── NOTES.txt
│    ├── serviceaccount.yaml
│    ├── service.yaml
│    └── tests
│        └── test-connection.yaml
└── values.yaml
charts 目录存放依赖的chart
Chart.yaml 包含Chart的基本信息,包括chart版本,名称等
templates 目录下存放应用一系列 k8s 资源的 yaml 模板
_helpers.tpl 此文件中定义一些可重用的模板片断,此文件中的定义在任何资源定义模板中可用
NOTES.txt 介绍chart 部署后的帮助信息,如何使用chart等
values.yaml 包含了必要的值定义(默认值), 用于存储 templates 目录中模板文件中用到变量的值
helm create
创建一个 Chart 模板
# helm create test
Creating test
helm package
打包一个 Chart 模板
[root@ci-base helm]# helm package test
Successfully packaged chart and saved it to: /home/k8s-example/helm/test-0.1.0.tgz
helm search
查找可用的 Chart 模板
[root@ci-base helm]# helm search hub nginx
URL                                                     CHART VERSION   APP VERSION     DESCRIPTION
https://hub.helm.sh/charts/wiremind/nginx               2.1.1                           An NGINX HTTP server
https://hub.helm.sh/charts/bitnami/nginx                8.2.3           1.19.6          Chart for the nginx server
.........
helm inspect
查看指定 Chart 的基本信息
[root@ci-base helm]# helm inspect chart test
apiVersion: v2
appVersion: 1.16.0
description: A Helm chart for Kubernetes
name: test
type: application
version: 0.1.0
Chart 模板示例
Chart 文件结构
wordpress
├── charts
├── Chart.yaml
├── README.md
├── requirements.lock
├── requirements.yaml
├── templates
│   ├── deployment.yaml
│   ├── externaldb-secrets.yaml
│   ├── _helpers.tpl
│   ├── ingress.yaml
│   ├── NOTES.txt
│   ├── pvc.yaml
│   ├── secrets.yaml
│   ├── svc.yaml
│   └── tls-secrets.yaml
└── values.yaml
一个 wordpress chart 如上(去除部分 test 和 charts 依赖), 基本结构由以下几个部分组成:
charts 存放子Chart (Subchart) 的定义,Subchart 指的是当前 Chart 依赖的 Chart , 在 requirements.yaml 中定义
Chart.yaml 包含 Chart 信息的 YAML 文件, 包括 Chart 的版本、名称等,在 DCE Helm 插件中还包含 Chart 的 团队授权 信息 和 是否公开 的信息
README.md 可选:Chart 的介绍信息等(该文件对于一个大型 Chart 来说十分重要)
Requirements.yaml 可选:列举当前 Chart 的需要依赖的 Chart
templates
该目录下存放 Chart 所有的 K8s 资源定义模板,通常不同的资源放在不同的文件中,DCE Helm 插件中自定义模板的 K8s 资源统一放在 all_sources.yaml 文件中
_helpers.tpl , 通常这个文件存放可重用的模板片段,该文件中的定义可以在 Chart 其它资源定义模板中使用
NOTES.txt,可选:一段简短使用说明的文本文件,用于安装 Release 后提示用户使用
values.yaml 当前 Chart 的默认配置的值
我们查看下使用 helm create 命令自动生成的 templates/service.yaml
文件。
apiVersion: v1
kind: Service
metadata:
  name: {{ include "mychart.fullname" . }}
  labels:
    {{- include "mychart.labels" . | nindent 4 }}
spec:
  type: {{ .Values.service.type }}
  ports:
    - port: {{ .Values.service.port }}
      targetPort: http
      protocol: TCP
      name: http
  selector:
    {{- include "mychart.selectorLabels" . | nindent 4 }}
可以看到其中有很多{{ }} 包围的字段,这是使用的 Go
template
创建的自定义字段,其中 mychart 开头的都是在 _helpers.tpl
中生成的定义。
编写一个简单的 Chart 示例
本节以构建一个名称为 nginx-test Chart 为示例,来描述一个 chart 必要条件。
# helm create nginx-test
Creating nginx-test
1、Chart.yaml 文件是 一个 chart 必要文件, 该文件可以简单包括以下字段(具体字段请参考Helm官网)
Chart.yaml文件组织格式
Chart.yaml用于提供Charts相关的各种元数据,如名称、版本、关键词、维护者信息、使用的模板引擎等,它是一个Charts必备的核心文件,主要包含以下字段。
·name:当前Charts的名称,必选字段。

·version:遵循语义化版本规范第2版的版本号,必选字段。

·description:当前项目的单语句描述信息,可选字段。

·keywords:当前项目的关键词列表,可选字段。

·home:当前项目的主页URL,可选字段。

·sources:当前项目用到的源码的来源URL列表,可选字段。

·maintainers:项目维护者信息,主要嵌套name、email和URL几个属性组成;可选字段。

·engine:模板引擎的名称,默认为gotpl,即go模板。

·icon:URL,指向当前项目的图标,SVG或PNG格式的图片;可选字段。

·appVersion:本项目用到的应用程序的版本号,可选字段,且不必为语义化版本。

·deprecated:当前Charts是否已废弃,可选字段,布尔型值。

·tillerVersion:当前Charts依赖的Tiller版本号,可以是语义化版本号的范围,如“>2.4.0”;可选字段。
面的示例信息是redis Charts中使用的Chart.yaml的内容,用户自行定义Charts编写相关文件时,要采用类似的文件格式:
appVersion: 4.0.9
description: Open source, advanced key-value store. It is often referred
  to as a data structure server since keys can contain strings, hashes,
  lists, sets and sorted sets.
engine: gotpl
home: http://redis.io/
icon: https://bitnami.com/assets/stacks/redis/img/redis-stack-220x234.png
keywords:
- redis
- keyvalue
- database
maintainers:
- email: containers@bitnami.com
  name: bitnami-bot
name: redis
sources:
- https://github.com/bitnami/bitnami-docker-redis
version: 3.3.0
nginx-test的Charts中使用的Chart.yaml的内容
[root@ci-base helm]# cat nginx-test/Chart.yaml |grep -v "^$"|grep -v "^#"
apiVersion: v2
name: nginx-test
description: A Helm chart for Kubernetes
type: application
version: 0.1.0
appVersion: 1.16.0
Charts中的依赖关系
requirements.yaml文件
·name:被依赖的Charts的名称。

·version:被依赖的Charts的版本。

·repository:被依赖的Charts所属的仓库及其URL;如果是非官方的仓库,则需要先用helm repo add命令将其添加进本地可用仓库。

·alias:为被依赖的Charts创建一个别名,从而让当前Charts可以将所依赖的Charts对应到新名称,即别名;可选字段。

·tags:默认情况下所有的Charts都会被装载,若给定了tags,则仅装载那些匹配到的Charts。

·condition:类似于tags字段,但需要通过自定义的条件来指明要装载的charts。

·import-values:导入子Charts中的的值;被导入的值需要在子charts中导出。
如下所示的示例,是Wordpress Charts中定义的动态依赖关系:
dependencies:
- name: mariadb
  version: 2.1.1
  repository: https://kubernetes-charts.storage.googleapis.com/
  condition: mariadb.enabled
  tags:
    - wordpress-database
一旦依赖关系文件配置完成,即可使用“helm dependency update”命令更新依赖关系,并自动下载被依赖的Charts至charts/目录中。
helm3 v2版本中。已经将依赖requirements.yaml去掉,默认requirements.yaml的内容直接写入Chart.yaml中。
Charts目录
若需要对依赖关系进行更多的控制,则所有被依赖到的Charts都能以手工方式直接复制到Charts目录中。一个被依赖到的Charts既可以是归档格式,也可以是展开的目录格式,不过,其名称不能以下划线(_)或点号(.)开头,此类文件会被Charts装载器自动忽略。
例如,Wordpress Charts依赖关系在其Charts目录中的反映类似如下所示:
charts/
└── mariadb
    ├── Chart.yaml
    ├── README.md
    ├── templates
    │   ├── configmap.yaml
    │   ├── deployment.yaml
    │   ├── _helpers.tpl
    │   ├── NOTES.txt
    │   ├── pvc.yaml
    │   ├── secrets.yaml
    │   ├── svc.yaml
    │   ├── test-runner.yaml
    │   └── tests.yaml
    └── values.yaml
2、values.yaml 文件是 chart 的必要文件,以 nginx 为示例:
[root@ci-base helm]# cat nginx-test/values.yaml |grep -v "^$"|grep -v "#"
replicaCount: 1
image:
  repository: nginx
  pullPolicy: IfNotPresent
  tag: ""
imagePullSecrets: []
nameOverride: ""
fullnameOverride: ""
serviceAccount:
  create: true
  annotations: {}
  name: ""
podAnnotations: {}
podSecurityContext: {}
securityContext: {}
service:
  type: ClusterIP
  port: 80
ingress:
  enabled: false
  annotations: {}
  hosts:
    - host: chart-example.local
      paths: []
  tls: []
resources: {}
autoscaling:
  enabled: false
  minReplicas: 1
  maxReplicas: 100
  targetCPUUtilizationPercentage: 80
nodeSelector: {}
tolerations: []
affinity: {}
从示例中可以看出,values.yaml 中定义了一些当前chart 的一些默认值,用于 templates 下的 K8s 资源 yaml 渲染时填充默认值。
不过需要注意的是,如果使用 helm install 来部署一个 Release , 可以通过下面命令指定一份yaml 文件作为填充值:
helm install --values=myvals.yaml nginx
注意:上面命令不要复制执行,执行会报错的。请根据实际情况执行!!!
3、创建 templates 下的模板文件, 用于生成 Kubernetes 资源清单(manifests) 如下所示:
# cat nginx-test/templates/deployment.yaml
apiVersion: apps/v1
kind: Deployment
metadata:
  name: {{ include "nginx-test.fullname" . }}
  labels:
...
上面定义了 一个 deployments.yaml 和 service.yaml 资源文件,里面使用 {{ }} 符号的是 Go 模板语言的标准。其中可以通过:
.Values 对象访问 values.yaml 文件的内容, 前面的dot(.) 表示从顶层命名空间开始,找到 Values 对象(下同)
.Release、.Chart 开头的预定义值可用于任何的模板中
.Chart 对象用来访问 Chart.yaml 文件的内容
.Release 对象是 Helm的内置对象之一, 使用 Helm 安装一个 release 时,由 Tiller 分配 release 的名称
4、命名模板(_helper.tpl) :可以从上面看到有 {{ template “nginx-test.fullname” . }} 定义。该定义由 _helper.tpl 文件定义的字段来实现,比如下面一个 _helper.tpl :
# cat nginx-test/templates/_helpers.tpl
{{/* vim: set filetype=mustache: */}}
{{/*
Expand the name of the chart.
*/}}
...
该模板定义了 “nginx-test.name”、“nginx-test.fullname”、“nginx-test.chart” 等可重用模板部分,当模板引擎读取该文件时,它存储对 nginx-test.name等的引用, 直到调用 template “nginx-test.name” 为止。然后把值渲染到模板中。
注意 {{ template “nginx-test.chart” . }} 后面有个dot(.),这是因为一个已命名的模板(用于创建 define) 被渲染时,它将接收由该 template 调用传入的范围(scope)。没有范围传入,在模板中无法访问任何内容,因此在:
{{- define "nginx-test.chart" -}}
这里面的 .Chart 将无法访问,导致在模板中无法看到内容,因为这里值为空
{{- end -}}
因此在模板中将 范围(scope) 传入即可正常使用:
# cat nginx-test/templates/service.yaml
apiVersion: v1
kind: Service
metadata:
  name: {{ include "nginx-test.fullname" . }}
在末尾传递了 . 这样就可以使用 .Values 或者 .Chart 或其它范围(scope)
5、Chart 依赖(requirements.yaml):比如 WordPress Chart 依赖于 mariadb Chart, 下面是 WordPress 的依赖(requirements.yaml):
dependencies:
- name: mariadb
  version: 5.x.x
  repository: https://kubernetes-charts.storage.googleapis.com/
  condition: mariadb.enabled
  tags:
    - wordpress-database
该文件列举当前 Chart 所有的 依赖(subchart)。有几个字段是必要的:
name: 依赖 Chart 的名称(必要)
version: 依赖 Chart 的版本号(必要)
repository: 依赖 Chart 的存储库完整URL,必须通过 helm repo add 添加 repository(存储库)到本地
Chart 模板开发指南
1 先创建模板
$  helm create mychart
Creating mychart
快速看一下目录 mychart/templates/
$  tree .
.
└── mychart
    ├── charts
    ├── Chart.yaml
    ├── templates
    │    ├── deployment.yaml
    │    ├── _helpers.tpl
    │    ├── hpa.yaml
    │    ├── ingress.yaml
    │    ├── NOTES.txt
    │    ├── serviceaccount.yaml
    │    ├── service.yaml
    │    └── tests
    │        └── test-connection.yaml
    └── values.yaml

4 directories, 10 files
看一下 mychart/templates/ 目录,发现如下几个文件已经存在。
NOTES.txt:chart 的 “帮助文本”。这会在用户运行
helm install时显示给用户。deployment.yaml:创建 Kubernetes deployment 的基本 manifest
service.yaml:为 deployment 创建 service 端点 service endpoint 的基本 manifest
_helpers.tpl:放置模板助手的地方,可以在整个 chart 中重复使用
而我们要做的就是…… 全部删除它们!这样我们就可以从头开始学习我们的教程。实际上,我们将创建自己的 NOTES.txt 和_helpers.tpl。
$ rm -rf mychart/templates/*.*
在编写生产级 chart 时,使用这些 chart 的基本版本可能非常有用。所以在你的日常 chart 制作中,可以不删除它们。
1.1 第一个模板
我们要创建的第一个模板将是一个 ConfigMap。在 Kubernetes 中,ConfigMap 只是存储配置数据的地方。其他的东西,比如 Pod,可以访问 ConfigMap 中的数据。
由于 ConfigMaps 是基础资源,它们为我们提供了一个很好的起点。
我们首先创建一个名为 mychart/templates/configmap.yaml:
apiVersion: v1
kind: ConfigMap
metadata:
  name: mychart-configmap
data:
  myvalue: "Hello World"
提示: 模板名称不遵循严格的命名模式。但是,我们建议 .yaml 为
YAML 文件后缀,.tpl 为模板助手后缀。
上面的 YAML 文件是一个简单的
ConfigMap,具有最少的必要字段。由于该文件位于 templates/
目录中,因此将通过模板引擎发送。
$  helm install myapp ./mychart/ -n dev
NAME: myapp
LAST DEPLOYED: Fri Apr  9 13:54:30 2021
NAMESPACE: dev
STATUS: deployed
REVISION: 1
TEST SUITE: None
在上面的输出中,我们可以看到我们的 ConfigMap 已经创建。使用 Helm,我们可以检索版本并查看加载的实际模板。
$  helm get manifest myapp -n dev
---
# Source: mychart/templates/configmap.yaml
apiVersion: v1
kind: ConfigMap
metadata:
  name: mychart-configmap
data:
  myvalue: "Hello World"
该 helm get manifest 命令获取 release
名称(full-coral)并打印出上传到服务器的所有 Kubernetes 资源。
每个文件都以 --- 开始作为 YAML
文档的开始,然后是一个自动生成的注释行,告诉我们该模板文件生成的这个
YAML 文档。
删除 release:
$ helm delete myapp -n dev
1.2 添加一个简单的模板调用
我们改一下 configmap.yaml
apiVersion: v1
kind: ConfigMap
metadata:
  name: {{.Release.Name}}-configmap
data:
  myvalue: "Hello World"
所以我们可以这样理解 .Release.Name:“从顶层命名空间开始,找到
Release 对象,然后在里面查找名为 Name 的对象”。
现在,当我们安装我们的资源时,我们会立即看到使用这个模板指令的结果:
$  helm install clunky-serval ./mychart -n dev
NAME: clunky-serval
LAST DEPLOYED: Fri Apr  9 14:02:25 2021
NAMESPACE: dev
STATUS: deployed
REVISION: 1
TEST SUITE: None
运行 helm get manifest clunky-serval 以查看整个生成的 YAML。
$  helm get manifest clunky-serval  -n dev
---
# Source: mychart/templates/configmap.yaml
apiVersion: v1
kind: ConfigMap
metadata:
  name: clunky-serval-configmap
data:
  myvalue: "Hello World"
可以使用
helm install clunky-serval --debug --dry-run ./mychart -n dev。这会将
chart 发送到 Tiller 服务器,它将渲染模板。但不是安装
chart,它会将渲染模板返回,以便可以看到输出:
$  helm uninstall clunky-serval -n dev
release "clunky-serval" uninstalled

$  helm install clunky-serval --debug --dry-run ./mychart -n dev
install.go:159: [debug] Original chart version: ""
install.go:176: [debug] CHART PATH: /app/k8s_yaml/helm_example/mychart
---
# Source: mychart/templates/configmap.yaml
apiVersion: v1
kind: ConfigMap
metadata:
  name: clunky-serval-configmap
data:
  myvalue: "Hello World"
使用 --dry-run 可以更容易地测试代码,但不能确保 Kubernetes
本身会接受生成的模板。
2 修改 Chart.yaml,Values.yaml
2.1 内置对象
Release 是可以在模板中访问的顶级对象之一。
Release:这个对象描述了 release 本身。它里面有几个对象:Release.Name:release 名称Release.Time:release 的时间Release.Namespace:release 的 namespace(如果清单未覆盖)Release.Service:release 服务的名称(始终是Tiller)。Release.Revision:此 release 的修订版本号。它从 1 开始,每helm upgrade一次增加一个。Release.IsUpgrade:如果当前操作是升级或回滚,则将其设置为true。Release.IsInstall:如果当前操作是安装,则设置为true。Values:从values.yaml文件和用户提供的文件传入模板的值。默认情况下,Values 是空的。Chart:Chart.yaml文件的内容。任何数据 Chart.yaml 将在这里访问。例如 {{.Chart.Name}}-{{.Chart.Version}} 将打印出来 mychart-0.1.0。chart 指南中 Charts Guide 列出了可用字段Files:这提供对 chart 中所有非特殊文件的访问。虽然无法使用它来访问模板,但可以使用它来访问 chart 中的其他文件。请参阅 “访问文件” 部分。Files.Get是一个按名称获取文件的函数(.Files.Get config.ini)Files.GetBytes是将文件内容作为字节数组而不是字符串获取的函数。这对于像图片这样的东西很有用。Capabilities:这提供了关于 Kubernetes 集群支持的功能的信息。Capabilities.APIVersions是一组版本信息。Capabilities.APIVersions.Has $version指示是否在群集上启用版本(batch/v1)。Capabilities.KubeVersion提供了查找 Kubernetes 版本的方法。它具有以下值:Major,Minor,GitVersion,GitCommit,GitTreeState,BuildDate,GoVersion,Compiler,和 Platform。Capabilities.TillerVersion提供了查找 Tiller 版本的方法。它具有以下值:SemVer,GitCommit,和 GitTreeState。Template:包含有关正在执行的当前模板的信息Name:到当前模板的 namespace 文件路径(例如mychart/templates/mytemplate.yaml)BasePath:当前 chart 模板目录的 namespace 路径(例如 mychart/templates)。
2.2 values 文件
该对象提供对传入 chart 的值的访问。其内容来自四个来源:
chart 中的
values.yaml文件如果这是一个子 chart,来自父 chart 的
values.yaml文件value 文件通过 helm install 或 helm upgrade 的 - f 标志传入文件(
helm install -f myvals.yaml ./mychart)通过
--set(例如helm install --set foo=bar ./mychart)
我们编辑 mychart/values.yaml,然后来编辑我们的 ConfigMap
模板。
删除默认带的 values.yaml,我们只设置一个参数:
favoriteDrink: coffee
现在我们可以在模板中使用这个:
apiVersion: v1
kind: ConfigMap
metadata:
  name: {{.Release.Name}}-configmap
data:
  myvalue: "Hello World"
  drink: {{.Values.favoriteDrink}}
注意我们在最后一行 {{ .Values.favoriteDrink}} 获取 favoriteDrink
的值。
让我们看看这是如何渲染的。
$  helm install myapp2021 --dry-run --debug ./mychart
install.go:159: [debug] Original chart version: ""
install.go:176: [debug] CHART PATH: /app/k8s_yaml/helm_example/mychart

NAME: myapp2021
LAST DEPLOYED: Fri Apr  9 14:11:16 2021
NAMESPACE: default
STATUS: pending-install
REVISION: 1
TEST SUITE: None
USER-SUPPLIED VALUES:
{}

COMPUTED VALUES:
favoriteDrink: coffee

HOOKS:
MANIFEST:
---
# Source: mychart/templates/configmap.yaml
apiVersion: v1
kind: ConfigMap
metadata:
  name: myapp2021-configmap
data:
  myvalue: "Hello World"
  drink: coffee
由于 favoriteDrink 在默认 values.yaml 文件中设置为
coffee,这就是模板中显示的值。我们可以轻松地在我们的 helm install
命令中通过加一个 --set 添标志来覆盖:
$  helm install myapp2021 --dry-run --debug --set favoriteDrink=slurm ./mychart
install.go:159: [debug] Original chart version: ""
install.go:176: [debug] CHART PATH: /app/k8s_yaml/helm_example/mychart

NAME: myapp2021
LAST DEPLOYED: Fri Apr  9 14:12:31 2021
NAMESPACE: default
STATUS: pending-install
REVISION: 1
TEST SUITE: None
USER-SUPPLIED VALUES:
favoriteDrink: slurm

COMPUTED VALUES:
favoriteDrink: slurm

HOOKS:
MANIFEST:
---
# Source: mychart/templates/configmap.yaml
apiVersion: v1
kind: ConfigMap
metadata:
  name: myapp2021-configmap
data:
  myvalue: "Hello World"
  drink: slurm
由于 --set 比默认 values.yaml
文件具有更高的优先级,我们的模板生成 drink: slurm。
values 文件也可以包含更多结构化内容。例如,我们在 values.yaml
文件中可以创建 favorite 部分,然后在其中添加几个键:
favorite:
  drink: coffee
  food: pizza
现在我们稍微修改模板:
apiVersion: v1
kind: ConfigMap
metadata:
  name: {{.Release.Name}}-configmap
data:
  myvalue: "Hello World"
  drink: {{.Values.favorite.drink}}
  food: {{.Values.favorite.food}}
虽然以这种方式构建数据是可以的,但建议保持 value 树浅一些,平一些。当我们看看为子 chart 分配值时,我们将看到如何使用树结构来命名值。
$  helm install myapp2021 --dry-run --debug  ./mychart
---
# Source: mychart/templates/configmap.yaml
apiVersion: v1
kind: ConfigMap
metadata:
  name: myapp2021-configmap
data:
  myvalue: "Hello World"
  drink: coffee
  food: pizza
2.3 模板函数和管道
使用quote函数
我们使用管道(|)将 “参数”
发送给函数:.Values.favorite.drink | quote。使用管道,我们可以将几个功能链接在一起:
apiVersion: v1
kind: ConfigMap
metadata:
  name: {{.Release.Name}}-configmap
data:
  myvalue: "Hello World"
  drink: {{.Values.favorite.drink | quote}}
  food: {{.Values.favorite.food | upper | quote}}
当评估时,该模板将产生如下结果:
# Source: mychart/templates/configmap.yaml
apiVersion: v1
kind: ConfigMap
metadata:
  name: trendsetting-p-configmap
data:
  myvalue: "Hello World"
  drink: "coffee"
  food: "PIZZA"
原来 pizza 现在已经转换为 "PIZZA"。
apiVersion: v1
kind: ConfigMap
metadata:
  name: {{.Release.Name}}-configmap
data:
  myvalue: "Hello World"
  drink: {{.Values.favorite.drink | repeat 5 | quote}}
  food: {{.Values.favorite.food | upper | quote}}
该 repeat 函数将回送给定的字符串和给定的次数,所以我们将得到这个输出:
# Source: mychart/templates/configmap.yaml
apiVersion: v1
kind: ConfigMap
metadata:
  name: melting-porcup-configmap
data:
  myvalue: "Hello World"
  drink: "coffeecoffeecoffeecoffeecoffee"
  food: "PIZZA"
使用 default 函数
示例:
drink: {{.Values.favorite.drink | default "tea" | quote}}
现在,我们将从以下位置删除喜欢的饮料设置 values.yaml:
favorite:
  #drink: coffee
  food: pizza
现在重新运行 helm install --dry-run --debug ./mychart 会产生这个
YAML:
# Source: mychart/templates/configmap.yaml
apiVersion: v1
kind: ConfigMap
metadata:
  name: fair-worm-configmap
data:
  myvalue: "Hello World"
  drink: "tea"
  food: "PIZZA"
运算符函数
对于模板,运算符(eq,ne,lt,gt,and,or
等等)都是已实现的功能。在管道中,运算符可以用圆括号(( 和
))分组。
将运算符放到声明的前面,后面跟着它的参数,就像使用函数一样。要多个运算符一起使用,将每个函数通过圆括号分隔。
2.4 流程控制
控制结构(模板说法中称为 “动作”)为模板作者提供了控制模板生成流程的能力。Helm 的模板语言提供了以下控制结构:
if/else用于创建条件块with指定范围range,它提供了一个 “for each” 风格的循环
除此之外,它还提供了一些声明和使用命名模板段的操作:
define在模板中声明一个新的命名模板template导入一个命名模板block声明了一种特殊的可填写模板区域
我们为 ConfigMap 添加一个简单的条件。如果饮料被设置为咖啡,我们将添加另一个设置:
apiVersion: v1
kind: ConfigMap
metadata:
  name: {{.Release.Name}}-configmap
data:
  myvalue: "Hello World"
  drink: {{.Values.favorite.drink | default "tea" | quote}}
  food: {{.Values.favorite.food | upper | quote}}
  {{if and .Values.favorite.drink (eq .Values.favorite.drink "coffee") }}mug: true{{ end }}
输出如下:
$  helm install myapp2021 --dry-run --debug  ./mychart
# Source: mychart/templates/configmap.yaml
apiVersion: v1
kind: ConfigMap
metadata:
  name: myapp2021-configmap
data:
  myvalue: "Hello World"
  drink: "coffee"
  food: "PIZZA"
  mug: true
控制空格
将空格替换为 *, 按照此规则将每个空格将被删除。一个在该行的末尾的
* 指示换行符将被移除
apiVersion: v1
kind: ConfigMap
metadata:
  name: {{.Release.Name}}-configmap
data:
  myvalue: "Hello World"
  drink: {{.Values.favorite.drink | default "tea" | quote}}
  food: {{.Values.favorite.food | upper | quote}}
  {{- if eq .Values.favorite.drink "coffee"}}
  mug: true
  {{- end}}
牢记这一点,我们可以通过 Helm 运行我们的模板并查看结果:
# Source: mychart/templates/configmap.yaml
apiVersion: v1
kind: ConfigMap
metadata:
  name: clunky-cat-configmap
data:
  myvalue: "Hello World"
  drink: "coffee"
  food: "PIZZA"
  mug: true
使用 with 修改范围
with
可以允许将当前范围(.)设置为特定的对象。例如,我们一直在使用的
.Values.favorites。让我们重写我们的 ConfigMap 来改变 .
范围来指向 .Values.favorites:
apiVersion: v1
kind: ConfigMap
metadata:
  name: {{.Release.Name}}-configmap
data:
  myvalue: "Hello World"
  {{- with .Values.favorite}}
  drink: {{.drink | default "tea" | quote}}
  food: {{.food | upper | quote}}
  {{- end}}
注意,现在我们可以引用 .drink 和 .food
无需对其进行限定。这是因为该 with 声明设置 . 为指向
.Values.favorite。在 {{end}} 后 . 复位其先前的范围。
循环range动作
我们在我们的 values.yaml 文件中添加一份披萨配料列表:
favorite:
  drink: coffee
  food: pizza
pizzaToppings:
  - mushrooms
  - cheese
  - peppers
  - onions
现在我们有一个列表(模板中称为 slice)pizzaToppings。我们可以修改我们的模板,将这个列表打印到我们的 ConfigMap 中:
apiVersion: v1
kind: ConfigMap
metadata:
  name: {{.Release.Name}}-configmap
data:
  myvalue: "Hello World"
  {{- with .Values.favorite}}
  drink: {{.drink | default "tea" | quote}}
  food: {{.food | upper | quote}}
  {{- end}}
  toppings: |-
    {{- range .Values.pizzaToppings}}
    - {{. | title | quote}}
    {{- end}}
我们可以直接向管道发送 . 的值,所以当我们这样做时
{{. | title | quote}},它会发送 . 到 title(标题 case
函数),然后发送到 quote。如果我们运行这个模板,输出将是:
$  helm install myapp2021 --dry-run --debug  ./mychart
---
# Source: mychart/templates/configmap.yaml
apiVersion: v1
kind: ConfigMap
metadata:
  name: myapp2021-configmap
data:
  myvalue: "Hello World"
  drink: "coffee"
  food: "PIZZA"
  toppings: |-
    - "Mushrooms"
    - "Cheese"
    - "Peppers"
    - "Onions"
YAML 中的
|-标记表示一个多行字符串。这可以是一种有用的技术,用于在清单中嵌入大块数据,如此处所示。
2.5 变量
在 Helm 模板中,变量是对另一个对象的命名引用。它遵循这个形式
$name。变量被赋予一个特殊的赋值操作符::=。我们可以使用变量重写上面的
Release.Name。
apiVersion: v1
kind: ConfigMap
metadata:
  name: {{.Release.Name}}-configmap
data:
  myvalue: "Hello World"
  {{- $relname := .Release.Name -}}
  {{- with .Values.favorite}}
  drink: {{.drink | default "tea" | quote}}
  food: {{.food | upper | quote}}
  release: {{$relname}}
  {{- end}}
注意,在我们开始 with 块之前,我们赋值
$relname :=.Release.Name。现在在 with 块内部,$relname
变量仍然指向发布名称。
$  helm install myapp2021 --dry-run --debug  ./mychart
---
# Source: mychart/templates/configmap.yaml
apiVersion: v1
kind: ConfigMap
metadata:
  name: myapp2021-configmap
data:
  myvalue: "Hello World"
  drink: "coffee"
  food: "PIZZA"
  release: myapp2021
# mychart/values.yaml
favorite:
  drink: coffee
  food: pizza
pizzaToppings:
  - mushrooms
  - cheese
  - peppers
  - onions
变量在 range
循环中特别有用。它们可以用于类似列表的对象以同时捕获索引和值:
apiVersion: v1
kind: ConfigMap
metadata:
  name: {{.Release.Name}}-configmap
data:
  myvalue: "Hello World"
  {{- $relname := .Release.Name -}}
  {{- with .Values.favorite}}
  drink: {{.drink | default "tea" | quote}}
  food: {{.food | upper | quote}}
  release: {{$relname}}
  {{- end}}
  toppings: |-
    {{- range $index, $topping := .Values.pizzaToppings}}
      {{$index}}: {{ $topping }}
    {{- end}}
注意,range
首先是变量,然后是赋值运算符,然后是列表。这将分配整数索引(从零开始)给
$index,值给 $topping。运行它将产生:
$  helm install myapp2021 --dry-run --debug  ./mychart
---
# Source: mychart/templates/configmap.yaml
apiVersion: v1
kind: ConfigMap
metadata:
  name: myapp2021-configmap
data:
  myvalue: "Hello World"
  drink: "coffee"
  food: "PIZZA"
  release: myapp2021
  toppings: |-
      0: mushrooms
      1: cheese
      2: peppers
      3: onions
对于同时具有键和值的数据结构,我们可以使用 range
来获得两者。例如,我们可以对 .Values.favorite 像这样循环:
apiVersion: v1
kind: ConfigMap
metadata:
  name: {{.Release.Name}}-configmap
data:
  myvalue: "Hello World"
  {{- range $key, $val := .Values.favorite}}
  {{$key}}: {{ $val | quote }}
  {{- end}}
现在在第一次迭代中,$key 是 drink,$val 是
coffee,第二次,$key 是 food,$val 会
pizza。运行上面的代码会生成下面这个:
$  helm install myapp2021 --dry-run --debug  ./mychart
HOOKS:
MANIFEST:
---
# Source: mychart/templates/configmap.yaml
apiVersion: v1
kind: ConfigMap
metadata:
  name: myapp2021-configmap
data:
  myvalue: "Hello World"
  drink: "coffee"
  food: "pizza"
3 模板和值
在 templates 目录下创建部署镜像所需要的 yaml 文件,并变量引用 yaml 里经常变动的字段
Helm Charts模板(template)遵循Go模板语言格式,并支持50种以上的来自Spring库的模板函数附件,以及为数不少的其他专用函数。所有的模板文件都存储于Templates目录中,在当前Charts被Helm引用时,此目录中的所有模板文件都会传递给模板引擎进行处理。
模板文件中用到的值(value)有如下两种提供方式。
通过Charts的values.yaml文件提供,通常用于提供默认值。
在运行“helm install”命令时传递包含所需要的自定义值的YAML文件;此处传递的值会覆盖默认值。
下面的示例是Wordpress Charts中Deployment模板文件的部分内容:
apiVersion: extensions/v1beta1
kind: Deployment
metadata:
  name: {{ template "fullname" . }}
  labels:
    app: {{ template "fullname" . }}
    chart: "{{ .Chart.Name }}-{{ .Chart.Version }}"
    release: "{{ .Release.Name }}"
    heritage: "{{ .Release.Service }}"
spec:
  replicas: 1
  template:
    metadata:
      labels:
        app: {{ template "fullname" . }}
    spec:
      containers:
      - name: {{ template "fullname" . }}
        image: "{{ .Values.image }}"
        imagePullPolicy: {{ default "" .Values.imagePullPolicy | quote }}
而在values.yaml一类的文件中定义值(value)时,既可以将它们定义为全局作用域,也可以定义为仅供Charts目录下的某个Charts所使用。一般来说,上级Charts可访问下级Charts中的值,但下级Charts不能访问其上级Charts的值。
如下面示例中的内容,其中title属于全局作用域,max_connections和password则仅属于mysql Charts,port仅属于apache Charts:
values.yaml
title: "My WordPress Site" # Sent to the WordPress template

mysql:
  max_connections: 100 # Sent to MySQL
  password: "secret"

apache:
  port: 8080 # Passed to Apache
4. 自定义Charts
4.1 生成一个空Charts
下面的命令会于命令执行的当前目录中创建一个名为demoapp的子目录作为Charts存储路径:
helm create demoapp

# 创建namespace
kubectl create namespace demoapp
此命令会初始化出一个空的Charts目录结构,它有着所需要的各个核心文件:
$  tree demoapp
demoapp
├── Chart.yaml
├── demoapp-values.yaml
├── README.md
├── templates
│    ├── deployment.yaml
│    ├── _helpers.tpl
│    ├── hpa.yaml
│    ├── ingress.yaml
│    ├── NOTES.txt
│    ├── NOTES.txt.bak
│    ├── serviceaccount.yaml
│    ├── service.yaml
│    └── tests
│        └── test-connection.yaml
└── values.yaml
4.2 修改Charts以部署自定义服务
apiVersion: v2
name: demoapp
description: A kubernetes-natvie application demo.

type: application

version: 0.1.0

appVersion: 1.0.0

maintainers:
  - name: MageEdu
    email: mage@magedu.com
    url: http://www.magedu.com
修改values.yaml文件为demo-app.yaml内容如下:
cp -rf values.yaml demoapp-values.yaml
replicaCount: 1

image:
  repository: ikubernetes/demoapp
  pullPolicy: IfNotPresent
  tag: "v1.0"

imagePullSecrets: []
nameOverride: ""
fullnameOverride: ""

serviceAccount:
  create: false
  annotations: {}
  name: ""

podAnnotations: {}

podSecurityContext: {}

securityContext: {}

# service
service:
  type: ClusterIP
  port: 80

# ingress
ingress:
  enabled: true
  annotations:
    kubernetes.io/ingress.class: "nginx"
  hosts:
    - host: helm-demoapp.runjs.cn
      paths:
        - /
  tls: []

resources: {}

autoscaling:
  enabled: false
  minReplicas: 1
  maxReplicas: 100
  targetCPUUtilizationPercentage: 80

nodeSelector: {}

tolerations: []

affinity: {}
templates/service.yaml
apiVersion: v1
kind: Service
metadata:
  name: {{ include "demoapp.fullname" . }}
  labels:
    {{- include "demoapp.labels" . | nindent 4 }}
spec:
  type: {{ .Values.service.type }}
  ports:
    - port: {{ .Values.service.port }}
      targetPort: http
      protocol: TCP
      name: http
  selector:
    {{- include "demoapp.selectorLabels" . | nindent 4 }}
templates/deployment.yaml
创建了一个pod中2个containers。
apiVersion: apps/v1
kind: Deployment
metadata:
  name: {{ include "demoapp.fullname" . }}
  labels:
    {{- include "demoapp.labels" . | nindent 4 }}
spec:
{{- if not .Values.autoscaling.enabled }}
  replicas: {{ .Values.replicaCount }}
{{- end }}
  selector:
    matchLabels:
      {{- include "demoapp.selectorLabels" . | nindent 6 }}
  template:
    metadata:
    {{- with .Values.podAnnotations }}
      annotations:
        {{- toYaml . | nindent 8 }}
    {{- end }}
      labels:
        {{- include "demoapp.selectorLabels" . | nindent 8 }}
    spec:
      {{- with .Values.imagePullSecrets }}
      imagePullSecrets:
        {{- toYaml . | nindent 8 }}
      {{- end }}
      serviceAccountName: {{ include "demoapp.serviceAccountName" . }}
      securityContext:
        {{- toYaml .Values.podSecurityContext | nindent 8 }}
      containers:
        - name: {{ .Chart.Name }}
          securityContext:
            {{- toYaml .Values.securityContext | nindent 12 }}
          image: "{{ .Values.image.repository }}:{{ .Values.image.tag | default .Chart.AppVersion }}"
          imagePullPolicy: {{ .Values.image.pullPolicy }}
          ports:
            - name: http
              containerPort: 80
              protocol: TCP
          livenessProbe:
            httpGet:
              path: /
              port: http
          readinessProbe:
            httpGet:
              path: /
              port: http
          resources:
            {{- toYaml .Values.resources | nindent 12 }}

        - name: wget
          image: registry.cn-hangzhou.aliyuncs.com/aliacs-app-catalog/busybox:1.30.1
          command: ['wget']
          args: ['{{ include "demoapp.fullname" . }}:{{ .Values.service.port }}']
      {{- with .Values.nodeSelector }}
      nodeSelector:
        {{- toYaml . | nindent 8 }}
      {{- end }}
      {{- with .Values.affinity }}
      affinity:
        {{- toYaml . | nindent 8 }}
      {{- end }}
      {{- with .Values.tolerations }}
      tolerations:
        {{- toYaml . | nindent 8 }}
      {{- end }}
templates/hpa.yaml 保持默认,无需修改
templates/NOTES.txt 保持默认,无需修改,部署后的访问方式,和提示信息
templates/serviceaccount.yaml 保持默认,无需修改
templates/_helpers.tpl 保持默认,无需修改
templates/ingress.yaml如下
{{- if .Values.ingress.enabled -}}
{{- $fullName := include "demoapp.fullname" . -}}
{{- $svcPort := .Values.service.port -}}
{{- if semverCompare ">=1.14-0" .Capabilities.KubeVersion.GitVersion -}}
apiVersion: networking.k8s.io/v1beta1
{{- else -}}
apiVersion: extensions/v1beta1
{{- end }}
kind: Ingress
metadata:
  name: {{ $fullName }}
  labels:
    {{- include "demoapp.labels" . | nindent 4 }}
  {{- with .Values.ingress.annotations }}
  annotations:
    {{- toYaml . | nindent 4 }}
  {{- end }}
spec:
  {{- if .Values.ingress.tls }}
  tls:
    {{- range .Values.ingress.tls }}
    - hosts:
        {{- range .hosts }}
        - {{ . | quote }}
        {{- end }}
      secretName: {{ .secretName }}
    {{- end }}
  {{- end }}
  rules:
    {{- range .Values.ingress.hosts }}
    - host: {{ .host | quote }}
      http:
        paths:
          {{- range .paths }}
          - path: {{ . }}
            backend:
              serviceName: {{ $fullName }}
              servicePort: {{ $svcPort }}
          {{- end }}
    {{- end }}
  {{- end }}
通过“helm lint”命令确认修改后的Charts是否遵循最佳实践且模板格式良好:
$ helm lint demoapp
==> Linting demoapp
[INFO] Chart.yaml: icon is recommended

1 chart(s) linted, 0 chart(s) failed
多数情况下,“helm lint”命令报告的错误信息,根据其错误提示中的行号信息即能定位出错误所在。确保一切问题都得以解决之后,即可通过“helm install”命令调试运行以查看由Charts定义的容器化应用是否能够正确部署:
$ helm install demoapp --debug ./demoapp --dry-run -n demoapp --set service.type=NodePort
确认上述命令输出信息无误后,移除命令中的“–dry-run”选项后再次运行命令即可完成应用的部署
通过-f选项将该文件附加于helm install命令即可将其合并到Chart默认的值文件上,例如下面的命令基于自定义的demoapp Chart创建了第二个实例,它通过Ingress将服务发布到集群之外。
使用demoapp-values.yaml模板进行部署
$ helm install demoapp ./demoapp --debug -n demoapp -f ./demoapp/demoapp-values.yaml
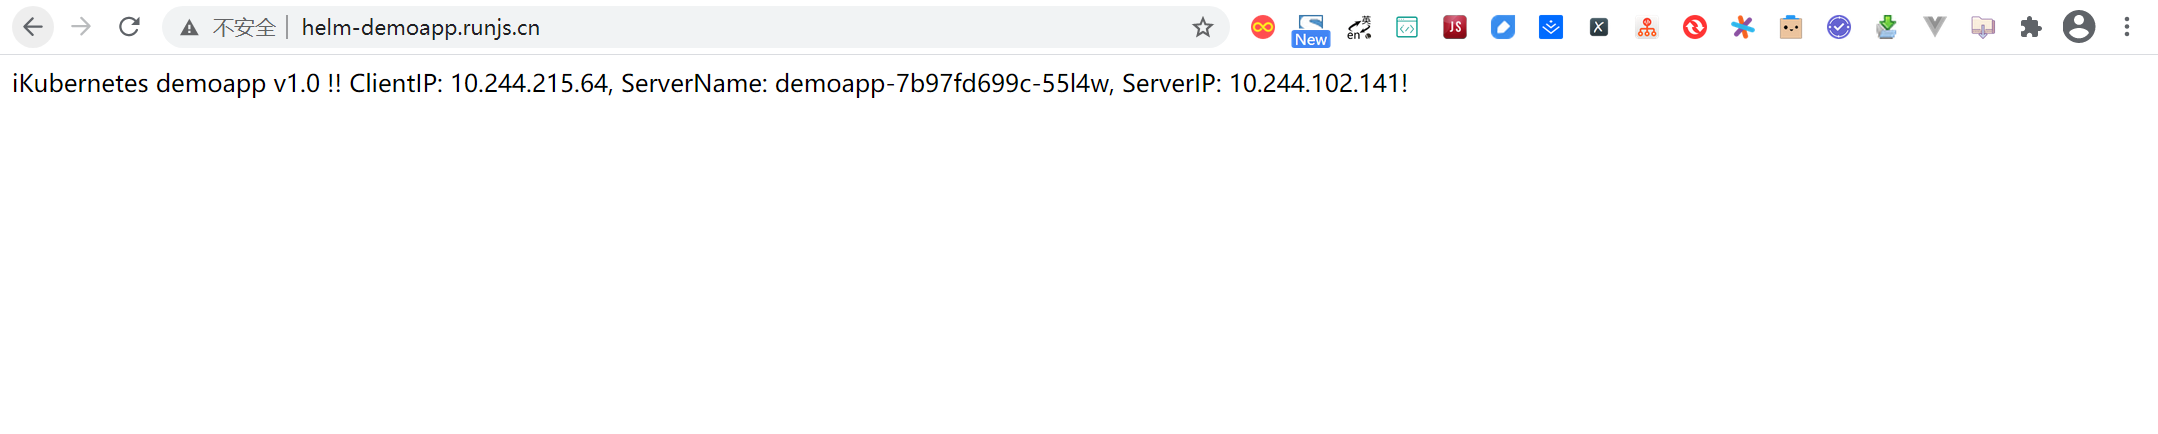
查看deployment、pod、service、ingress等信息
$ kubectl get deployment,pod,svc,ingress -n demoapp
NAME                      READY   UP-TO-DATE   AVAILABLE   AGE
deployment.apps/demoapp   1/1     1            1           2m47s

NAME                           READY   STATUS    RESTARTS   AGE
pod/demoapp-7b97fd699c-55l4w   1/1     Running   0          2m47s

NAME              TYPE        CLUSTER-IP       EXTERNAL-IP   PORT(S)   AGE
service/demoapp   ClusterIP   10.105.213.227   <none>        80/TCP    2m47s

NAME                         CLASS    HOSTS                   ADDRESS   PORTS   AGE
ingress.extensions/demoapp   <none>   helm-demoapp.runjs.cn             80      2m47s
5. 打包及分享
测试完成的自定义Chart可打包后存储在目标仓库仅供自己或有限范围内的用户使用,也可按需公开回馈到社区之中。helm package命令基于众多选项提供了灵活的打包机制,如下的命令就会先更新依赖关系再进行打包操作。
$ helm package CI-gitee-helm/
Successfully packaged chart and saved it to: /data/jenkins/gitee_workspace_parallel/gitee-ci-3.0.0.tgz
将该仓库添加至本地helm命令的可用列表中。
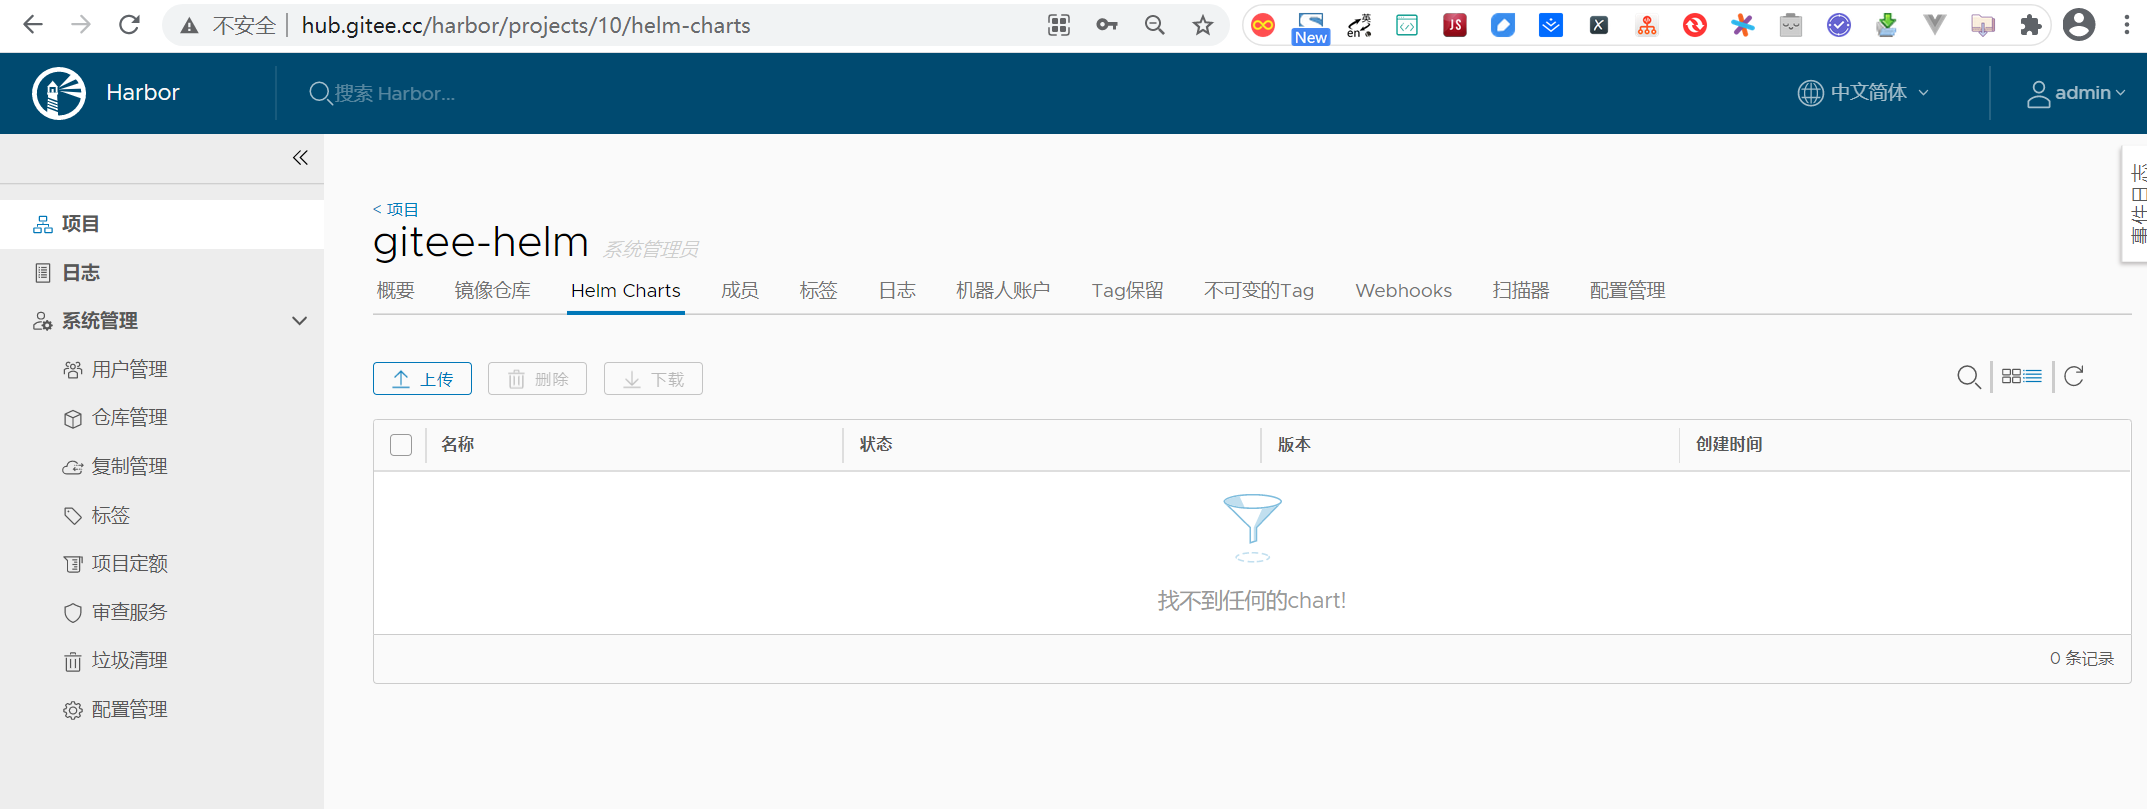
该类Chart的仓库地址为https://hub.xxxx.xxx/chartrepo/<PROJECT>
该类Chart的仓库地址为http://hub.gitee.cc/chartrepo/gitee-helm
$ helm repo add gitee-helm http://hub.gitee.cc/chartrepo/gitee-helm
"gitee-helm" has been added to your repositories
$ helm repo list
NAME            URL
ingress-nginx   https://kubernetes.github.io/ingress-nginx
stable          https://kubernetes.oss-cn-hangzhou.aliyuncs.com/charts
cilium          https://helm.cilium.io/
gitee-helm      http://hub.gitee.cc/chartrepo/gitee-helm
接下来,我们可以直接点击如图中的“上传”按钮在Web GUI中完成Chart上传,也可以为helm添加向仓库推送Chart的push插件,以便直接通过命令行完成Chart上传。Helm的插件管理子命令为plugin,下面的命令就用于安装push插件。
helm(3.0.3)现在默认不支持推送到charts库,需要安装插件helm-push
https://github.com/chartmuseum/helm-push
$ helm plugin install https://github.com/chartmuseum/helm-push
Downloading and installing helm-push v0.9.0 ...
https://github.com/chartmuseum/helm-push/releases/download/v0.9.0/helm-push_0.9.0_linux_amd64.tar.gz
Installed plugin: push
这里最好本地配置一下 github 的 dns 地址,不然可能会出现链接超时的现象
安装好插件之后,就可以push charts 到 harbor 里面了
$ helm push gitee-ci-3.0.0.tgz gitee-helm --username xxx --password xxxxx
Pushing gitee-ci-3.0.0.tgz to gitee-helm...
Done.
出现以上就说明 push 成功了
# 更新
$ helm repo update

# 下载
$ helm pull gitee-helm/gitee-ci
Helm3 Chart多依赖微服务构建案例
1. 创建父chart
创建一个前端Vue作为父Chart。
$ helm create vue
当前的 Chart 结构如下:
$ tree vue/
vue/
├── charts
├── Chart.yaml
├── templates
│    ├── deployment.yaml
│    ├── _helpers.tpl
│    ├── hpa.yaml
│    ├── ingress.yaml
│    ├── NOTES.txt
│    ├── serviceaccount.yaml
│    ├── service.yaml
│    └── tests
│        └── test-connection.yaml
└── values.yaml
charts:目录用于存放其他依赖的chart(我们称之为子chart)。
Chart.yaml:文件包含chart的说明。
templates:目录用于放置模板文件。是所有资源的位置,我们可以看到很多kubernetes的资源文件都在这里存放。
values.yaml:文件对模板也很重要。该文件包含 chart
默认值。这些值可能在用户在 helm install 或 helm upgrade 期间被覆盖。
templates目录中的文件:
`deployment.yaml`:创建Kubernetes工作负载的基本文件。

`_helpers.tpl`:放置模板的地方,该文件中定义模版可以在整个chart中重复使用。

`hpa.yaml`:HPA配置文件。

`ingress.yaml`:负载均衡配置文件。

`NOTES.txt`:chart的 “帮助文本”。这会在用户运行helm install时显示给用户。

`serviceaccount.yaml`:serviceaccount配置文件。

`service.yaml`:服务发现的配置文件。

`ests/test-connection.yaml`:用于测试chart安装后的测试pod。
2. 创建子Chart
创建eureka注册中心、oauth2鉴权中心和一个MS微服务,作为子Chart。
$ cd vue/charts/

$ helm create eureka \
> && helm create oauth2 \
> && helm create ms \
> && helm create ws
现在当前目录我们一共有五个待调试的Chart。
vue          ---父chart
eureka       ---子chart
oauth2       ---子chart
ms           ---子chart
ws           ---子chart
[root@ci-base helm]# tree vue/
vue/
├── charts
     ├── eureka
│    │    ├── charts
│    │    ├── Chart.yaml
│    │    ├── templates
│    │    │    ├── deployment.yaml
│    │    │    ├── _helpers.tpl
│    │    │    ├── hpa.yaml
│    │    │    ├── ingress.yaml
│    │    │    ├── NOTES.txt
│    │    │    ├── serviceaccount.yaml
│    │    │    ├── service.yaml
│    │    │    └── tests
│    │    │        └── test-connection.yaml
│    │    └── values.yaml
│    ├── ms
│    │    ├── charts
│    │    ├── Chart.yaml
│    │    ├── templates
│    │    │    ├── deployment.yaml
│    │    │    ├── _helpers.tpl
│    │    │    ├── hpa.yaml
│    │    │    ├── ingress.yaml
│    │    │    ├── NOTES.txt
│    │    │    ├── serviceaccount.yaml
│    │    │    ├── service.yaml
│    │    │    └── tests
│    │    │        └── test-connection.yaml
│    │    └── values.yaml
│    ├── oauth2
│    │    ├── charts
│    │    ├── Chart.yaml
│    │    ├── templates
│    │    │    ├── deployment.yaml
│    │    │    ├── _helpers.tpl
│    │    │    ├── hpa.yaml
│    │    │    ├── ingress.yaml
│    │    │    ├── NOTES.txt
│    │    │    ├── serviceaccount.yaml
│    │    │    ├── service.yaml
│    │    │    └── tests
│    │    │        └── test-connection.yaml
│    │    └── values.yaml
│    └── ws
│        ├── charts
│        ├── Chart.yaml
│        ├── templates
│        │    ├── deployment.yaml
│        │    ├── _helpers.tpl
│        │    ├── hpa.yaml
│        │    ├── ingress.yaml
│        │    ├── NOTES.txt
│        │    ├── serviceaccount.yaml
│        │    ├── service.yaml
│        │    └── tests
│        │        └── test-connection.yaml
│        └── values.yaml
├── Chart.yaml
├── templates
│    ├── deployment.yaml
│    ├── _helpers.tpl
│    ├── hpa.yaml
│    ├── ingress.yaml
│    ├── NOTES.txt
│    ├── serviceaccount.yaml
│    ├── service.yaml
│    └── tests
│        └── test-connection.yaml
└── values.yaml
3.调试
3.1 调试父Chart
首先删除``Chart``中无用的文件,所有文件根据自己需求创建。
rm -rf vue/values.yaml vue/templates/*
3.1.1 创建命名空间namespace模版文件
values.yaml文件中定义如下(每个值后续都会用到,这里统一写完):
$ cat vue/values.yaml
nameSpace: microservice
secretsName: mysecret
imageCredentials:
  registry: http://192.168.1.40
  username: admin
  password: Yidongjituan123
replicaCount: 1
image:
  repository: 192.168.1.40/xzzyy/vue-saas
  tag: 95e740c61bd7f9b4b3be62f819d00f90fe10ac24
service:
  port: 40099
创建namespace模版文件。
vim vue/templates/namespace.yaml
apiVersion: v1
kind: Namespace
metadata:
  name: {{ .Values.nameSpace }}
  labels:
    name: {{ .Values.nameSpace }}
3.1.2 创建镜像仓库secrets模版文件
镜像拉的secrets实质上是注册,用户名和密码的组合。在正在部署的应用程序中可能需要它们,但要创建它们需要多次运行 base64。我们可以编写一个模板来组合Docker配置文件,以用作Secret的有效载体。这里是一个例子:
我们定义我们的帮助模板如下:
vim vue/templates/_helpers.tpl
{{- define "imagePullSecret"}}
{{- printf "{\"auths\": {\"%s\": {\"auth\": \"%s\"}}}" .Values.imageCredentials.registry (printf "%s:%s" .Values.imageCredentials.username .Values.imageCredentials.password | b64enc) | b64enc }}
{{- end}}
创建secrets模版文件。
vim vue/templates/secrets.yaml
apiVersion: v1
kind: Secret
metadata:
  name: {{ .Values.secretsName }}
  namespace: {{ .Values.nameSpace }}
type: kubernetes.io/dockerconfigjson
data:
  .dockerconfigjson: {{ template "imagePullSecret" . }}
3.1.3 创建工作负载deployment模版文件
vim vue/templates/deployment.yaml
apiVersion: apps/v1
kind: Deployment
metadata:
  name: {{ .Chart.Name }}
  namespace: {{ .Values.nameSpace }}
spec:
  replicas: {{ .Values.replicaCount }}
  strategy:
    type: RollingUpdate
    rollingUpdate:
      maxSurge: 1
      maxUnavailable: 0
  selector:
    matchLabels:
      app: {{ .Chart.Name }}
  template:
    metadata:
      labels:
        app: {{ .Chart.Name }}
    spec:
      restartPolicy: Always
      imagePullSecrets:
      - name: {{ .Values.secretsName }}
      containers:
      - name: {{ .Chart.Name }}
        image: "{{ .Values.image.repository }}:{{ .Values.image.tag }}"
        imagePullPolicy: Always
        ports:
        - name: http
          containerPort: {{ .Values.service.port }}
          protocol: TCP
        startupProbe:
          httpGet:
            path: /
            port: 8080
          failureThreshold: 10
          periodSeconds: 5
        livenessProbe:
          httpGet:
            path: /
            port: 8080
          initialDelaySeconds: 10
          failureThreshold: 1
          periodSeconds: 10
        readinessProbe:
          httpGet:
            path: /
            port: 8080
          initialDelaySeconds: 10
          failureThreshold: 3
          periodSeconds: 5
3.1.4 创建服务发现service模版文件
vim vue/templates/service.yaml
apiVersion: v1
kind: Service
metadata:
  name: {{ .Chart.Name }}
  namespace: {{ .Values.nameSpace }}
  labels:
    name: {{ .Chart.Name }}
spec:
  type: NodePort
  ports:
  - port: {{ .Values.service.port }}
    targetPort: 8080
    nodePort: {{ .Values.service.port }}
    protocol: TCP
  selector:
    app: {{ .Chart.Name }}
使用helm install --dry-run demo vue/可对模版进行渲染预览,如渲染不成功,根据提示修改即可。
渲染后的样式:
NAME: demo
LAST DEPLOYED: Thu Jul 23 16:06:25 2020
NAMESPACE: default
STATUS: pending-install
REVISION: 1
TEST SUITE: None
HOOKS:
MANIFEST:
---
# Source: vue/templates/namespace.yaml
apiVersion: v1
kind: Namespace
metadata:
  name: microservice
  labels:
    name: microservice
---
# Source: vue/templates/secrets.yaml
apiVersion: v1
kind: Secret
metadata:
  name: mysecret
  namespace: microservice
type: kubernetes.io/dockerconfigjson
data:
  .dockerconfigjson: eyJhdXRocyI6IHsiaHR0cDovLzE5Mi4xNjguMS40MCI6IHsiYXV0aCI6ICJZV1J0YVc0NldXbGtiMjVuYW1sMGRXRnVNVEl6In19fQ==
---
# Source: vue/templates/deployment.yaml
apiVersion: apps/v1
kind: Deployment
metadata:
  name: vue
  namespace: microservice
spec:
  replicas: 1
  strategy:
    type: RollingUpdate
    rollingUpdate:
      maxSurge: 1
      maxUnavailable: 0
  selector:
    matchLabels:
      app: vue
  template:
    metadata:
      labels:
        app: vue
    spec:
      restartPolicy: Always
      imagePullSecrets:
      - name: mysecret
      containers:
      - name: vue
        image: "192.168.1.40/xzzyy/vue-saas:95e740c61bd7f9b4b3be62f819d00f90fe10ac24"
        imagePullPolicy: Always
        ports:
        - name: http
          containerPort: 40099
......
3.2 调试子Chart
由于父Chart已经创建完成namespace、secrets,子Chart无需再次创建。删除无用文件。
cd vue/charts/
rm -rf eureka/values.yaml eureka/templates/* \
> && rm -rf oauth2/values.yaml oauth2/templates/* \
> &&  rm -rf ms/values.yaml ms/templates/* \
> &&  rm -rf ws/values.yaml ws/templates/*
3.2.1 创建配置映射configmap模版文件
使用configmap统一管理Spring Boot的配置文件。只需要创建一个configmap,然后将四个配置文件以键值对的方式存入该configmap,以便引用。
values.yaml文件中定义如下(每个值后续都会用到,这里统一写完):
vim eureka/values.yaml
configmapName: demo-config
nameSpace: microservice
secretsName: mysecret
replicaCount: 1
image:
  repository: 192.168.1.40/xzzyy/eureka
  tag: bff976dda6786a2b593ccf5a76bd2e1cf670e615
service:
  port: 40000
创建configmap模版文件。
vim eureka/templates/configmap.yaml
apiVersion: v1
kind: ConfigMap
metadata:
  name: {{ .Values.configmapName }}
  namespace: {{ .Values.nameSpace }}
data:
{{ (.Files.Glob "config/*").AsConfig | indent 2 }}
使用引用静态文件的方式,直接引入配置文件内容,经过这种方式会创建四个键值对,键为配置名称,值为配置文件内容。不过需要提前将配置文件放入Chart的根目录,如下:
eureka/
├── charts
├── Chart.yaml
├── config
│   ├── eureka.yml
│   ├── ms.yml
│   ├── oauth2.yml
│   └── ws.yml
├── templates
│   ├── configmap.yaml
│   ├── deployment.yaml
│   └── service.yaml
└── values.yaml
编写完之后可以通过helm install --dry-run confimap eureka/验证模版正确性。
3.2.2 创建工作负载deployment模版文件
eureka
vim eureka/templates/deployment.yaml
apiVersion: apps/v1
kind: Deployment
metadata:
  name: {{ .Chart.Name }}
  namespace: {{ .Values.nameSpace }}
spec:
  replicas: {{ .Values.replicaCount }}
  strategy:
    type: RollingUpdate
    rollingUpdate:
      maxSurge: 1
      maxUnavailable: 0
  selector:
    matchLabels:
      app: {{ .Chart.Name }}
  template:
    metadata:
      labels:
        app: {{ .Chart.Name }}
    spec:
      restartPolicy: Always
      imagePullSecrets:
      - name: {{ .Values.secretsName }}
      containers:
      - name: {{ .Chart.Name }}
        image: "{{ .Values.image.repository }}:{{ .Values.image.tag }}"
        imagePullPolicy: Always
        ports:
        - name: http
          containerPort: {{ .Values.service.port }}
          protocol: TCP
        startupProbe:
          tcpSocket:
            port: http
          initialDelaySeconds: 5
          failureThreshold: 10
          periodSeconds: 5
        readinessProbe:
          tcpSocket:
            port: http
          failureThreshold: 3
          periodSeconds: 5
        livenessProbe:
          tcpSocket:
            port: http
          failureThreshold: 1
          periodSeconds: 10
        resources:
          limits:
            cpu: 2
            memory: 2Gi
          requests:
            cpu: 1
            memory: 1Gi
        volumeMounts:
          - name: config-volume
            mountPath: /config
      volumes:
      - name: config-volume
        configMap:
          name: {{ .Values.configmapName }}
          items:
          - key: {{ .Chart.Name }}.yml
            path: bootstrap.yml
oauth2
values.yaml内容。
vim oauth2/values.yaml
secretsName: mysecret
configmapName: demo-config
nameSpace: microservice
replicaCount: 1
image:
  repository: 192.168.1.40/xzzyy/oauth2
  tag: bff976dda6786a2b593ccf5a76bd2e1cf670e615
service:
  port: 40001
deployment.yaml内容
vim oauth2/templates/deployment.yaml
apiVersion: apps/v1
kind: Deployment
metadata:
  name: {{ .Chart.Name }}
  namespace: {{ .Values.nameSpace }}
spec:
  replicas: {{ .Values.replicaCount }}
  strategy:
    type: RollingUpdate
    rollingUpdate:
      maxSurge: 1
      maxUnavailable: 0
  selector:
    matchLabels:
      app: {{ .Chart.Name }}
  template:
    metadata:
      labels:
        app: {{ .Chart.Name }}
    spec:
      restartPolicy: Always
      imagePullSecrets:
      - name: {{ .Values.secretsName }}
      containers:
      - name: {{ .Chart.Name }}
        image: "{{ .Values.image.repository }}:{{ .Values.image.tag }}"
        imagePullPolicy: Always
        ports:
        - name: http
          containerPort: {{ .Values.service.port }}
          protocol: TCP
        startupProbe:
          tcpSocket:
            port: http
          initialDelaySeconds: 5
          failureThreshold: 10
          periodSeconds: 5
        readinessProbe:
          tcpSocket:
            port: http
          failureThreshold: 3
          periodSeconds: 5
        livenessProbe:
          tcpSocket:
            port: http
          failureThreshold: 1
          periodSeconds: 10
        resources:
          limits:
            cpu: 2
            memory: 2Gi
          requests:
            cpu: 1
            memory: 1Gi
        volumeMounts:
          - name: config-volume
            mountPath: /config
      volumes:
      - name: config-volume
        configMap:
          name: {{ .Values.configmapName }}
          items:
          - key: {{ .Chart.Name }}.yml
            path: bootstrap.yml
ws
values.yaml内容
vim ws/values.yaml
secretsName: mysecret
configmapName: demo-config
nameSpace: microservice
replicaCount: 1
image:
  repository: 192.168.1.40/xzzyy/doctor-ws
  tag: bff976dda6786a2b593ccf5a76bd2e1cf670e615
service:
  port: 40002
deployment.yaml内容
vim ws/templates/deployment.yaml
apiVersion: apps/v1
kind: Deployment
metadata:
  name: {{ .Chart.Name }}
  namespace: {{ .Values.nameSpace }}
spec:
  replicas: {{ .Values.replicaCount }}
  strategy:
    type: RollingUpdate
    rollingUpdate:
      maxSurge: 1
      maxUnavailable: 0
  selector:
    matchLabels:
      app: {{ .Chart.Name }}
  template:
    metadata:
      labels:
        app: {{ .Chart.Name }}
    spec:
      restartPolicy: Always
      imagePullSecrets:
      - name: {{ .Values.secretsName }}
      containers:
      - name: {{ .Chart.Name }}
        image: "{{ .Values.image.repository }}:{{ .Values.image.tag }}"
        imagePullPolicy: Always
        ports:
        - name: http
          containerPort: {{ .Values.service.port }}
          protocol: TCP
        startupProbe:
          httpGet:
            path: /doc.html
            port: http
          initialDelaySeconds: 5
          failureThreshold: 10
          periodSeconds: 5
        livenessProbe:
          httpGet:
            path: /doc.html
            port: http
          failureThreshold: 1
          periodSeconds: 10
        readinessProbe:
          httpGet:
            path: /doc.html
            port: http
          failureThreshold: 3
          periodSeconds: 5
        resources:
          limits:
            cpu: 2
            memory: 2Gi
          requests:
            cpu: 1
            memory: 1Gi
        volumeMounts:
        - name: config-volume
          mountPath: /config
      volumes:
      - name: config-volume
        configMap:
          name: {{ .Values.configmapName }}
          items:
          - key: {{ .Chart.Name }}.yml
            path: bootstrap.yml
ms
values.yaml内容
vim ms/values.yaml
secretsName: mysecret
configmapName: demo-config
nameSpace: microservice
replicaCount: 1
image:
  repository: 192.168.1.40/xzzyy/online-registration-ms
  tag: bff976dda6786a2b593ccf5a76bd2e1cf670e615
service:
  port: 40003
deployment.yaml内容
vim ms/templates/deployment.yaml
apiVersion: apps/v1
kind: Deployment
metadata:
  name: {{ .Chart.Name }}
  namespace: {{ .Values.nameSpace }}
spec:
  replicas: {{ .Values.replicaCount }}
  strategy:
    type: RollingUpdate
    rollingUpdate:
      maxSurge: 1
      maxUnavailable: 0
  selector:
    matchLabels:
      app: {{ .Chart.Name }}
  template:
    metadata:
      labels:
        app: {{ .Chart.Name }}
    spec:
      restartPolicy: Always
      imagePullSecrets:
      - name: {{ .Values.secretsName }}
      containers:
      - name: {{ .Chart.Name }}
        image: "{{ .Values.image.repository }}:{{ .Values.image.tag }}"
        imagePullPolicy: Always
        ports:
        - name: http
          containerPort: {{ .Values.service.port }}
          protocol: TCP
        startupProbe:
          httpGet:
            path: /doc.html
            port: http
          initialDelaySeconds: 5
          failureThreshold: 10
          periodSeconds: 5
        livenessProbe:
          httpGet:
            path: /doc.html
            port: http
          failureThreshold: 1
          periodSeconds: 10
        readinessProbe:
          httpGet:
            path: /doc.html
            port: http
          failureThreshold: 3
          periodSeconds: 5
        resources:
          limits:
            cpu: 2
            memory: 2Gi
          requests:
            cpu: 1
            memory: 1Gi
        volumeMounts:
        - name: config-volume
          mountPath: /config
      volumes:
      - name: config-volume
        configMap:
          name: {{ .Values.configmapName }}
          items:
          - key: {{ .Chart.Name }}.yml
            path: bootstrap.yml
3.2.3 创建服务发现service模版文件
eureka
vim eureka/templates/service.yaml
apiVersion: v1
kind: Service
metadata:
  name: {{ .Chart.Name }}
  namespace: {{ .Values.nameSpace }}
  labels:
    name: {{ .Chart.Name }}
spec:
  type: NodePort
  ports:
  - port: {{ .Values.service.port }}
    targetPort: {{ .Values.service.port }}
    nodePort: {{ .Values.service.port }}
    protocol: TCP
  selector:
    app: {{ .Chart.Name }}
oauth2
vim oauth2/templates/service.yaml
apiVersion: v1
kind: Service
metadata:
  name: {{ .Chart.Name }}
  namespace: {{ .Values.nameSpace }}
  labels:
    name: {{ .Chart.Name }}
spec:
  type: NodePort
  ports:
  - port: {{ .Values.service.port }}
    targetPort: {{ .Values.service.port }}
    nodePort: {{ .Values.service.port }}
    protocol: TCP
  selector:
    app: {{ .Chart.Name }}
ws
vim ws/templates/service.yaml
apiVersion: v1
kind: Service
metadata:
  name: {{ .Chart.Name }}
  namespace: {{ .Values.nameSpace }}
  labels:
    name: {{ .Chart.Name }}
spec:
  type: NodePort
  ports:
  - port: {{ .Values.service.port }}
    targetPort: {{ .Values.service.port }}
    nodePort: {{ .Values.service.port }}
    protocol: TCP
  selector:
    app: {{ .Chart.Name }}
ms
vim ms/templates/service.yaml
apiVersion: v1
kind: Service
metadata:
  name: {{ .Chart.Name }}
  namespace: {{ .Values.nameSpace }}
  labels:
    name: {{ .Chart.Name }}
spec:
  type: NodePort
  ports:
  - port: {{ .Values.service.port }}
    targetPort: {{ .Values.service.port }}
    nodePort: {{ .Values.service.port }}
    protocol: TCP
  selector:
    app: {{ .Chart.Name }}
通过helm install --dry-run demo xxxx/验证每个Chart的正确性。
3.3 联合调试父子Chart
保证每个Chart都可以``–dry-run``渲染成功,然后就可以开始进行联调试
首先修改父Chart的Chart.yaml文件,添加依赖关系。
vim vue/Chart.yaml
追加如下内容,file://是针对Chart.yaml的相对路径,也可以写远程repo库的地址,这里是本地调试没有用到。
dependencies:
  - name: eureka
    repository: file://../eureka/
    version: 0.1.0
  - name: oauth2
    repository: file://../oauth2/
    version: 0.1.0
  - name: ws
    repository: file://../ws/
    version: 0.1.0
  - name: ms
    repository: file://../ms/
    version: 0.1.0
然后使用dependency update参数,构建chart依赖。
[root@harbor ~]# helm dependency update vue/
Hang tight while we grab the latest from your chart repositories...
...Successfully got an update from the "myrepo" chart repository
Update Complete. ⎈Happy Helming!⎈
Saving 4 charts
Deleting outdated charts
最终父Chart目录结构
vue/
├── Chart.lock
├── charts
│   ├── eureka-0.1.0.tgz
│   ├── ms-0.1.0.tgz
│   ├── oauth2-0.1.0.tgz
│   └── ws-0.1.0.tgz
├── Chart.yaml
├── templates
│   ├── deployment.yaml
│   ├── _helpers.tpl
│   ├── namespace.yaml
│   ├── secrets.yaml
│   └── service.yaml
└── values.yaml
4. 安装
直接使用helm本地安装父Chart即可
helm install demo vue/
查看安装的chart
$ helm list
NAME                        NAMESPACE   REVISION    UPDATED                                 STATUS      CHART           APP VERSION
demo                        default     1           2020-07-23 17:18:14.746382646 +0800 CST deployed    vue-0.
查看部署的deployment
$ kubectl get deployments.apps -n microservice
NAME     READY   UP-TO-DATE   AVAILABLE   AGE
eureka   1/1     1            1           43s
ms       1/1     1            1           43s
oauth2   1/1     1            1           43s
vue      1/1     1            1           43s
ws       1/1     1            1           43s
5.优化
述步骤完成的多依赖构建,已经满足一键部署多个服务的需求了,但是通过实际操作下来,会发现一些问题:
每个子chart中都有相同的values值。例如:secretsName、configmapName、nameSpace。 有很多模版都是相同的。例如:deployment.yaml、service.yaml。
如果有二三十个微服务后端的话,会有一大部分时间在做重复工作。所以我们就在想能不能复用这些常量和模版。
5.1 全局常量
可以修改父Chart的values.yaml,追加一个global值,将所有子Chart会用到的值设置为全局常量。
imageCredentials:
  registry: http://192.168.1.40
  username: admin
  password: Yidongjituan123
replicaCount: 1
image:
  repository: 192.168.1.40/xzzyy/vue-saas
  tag: 95e740c61bd7f9b4b3be62f819d00f90fe10ac24
service:
  port: 40099

global:
  nameSpace: microservice
  secretsName: mysecret
  configmapName: demo-config
此值可供所有chart使用,使用方式:.Values.global.nameSpace、.Values.global.secretsName等等。
这样我们就无需在每个子Chart的values.yaml中重复定义这些值了,只需修改一下模版中的使用方式即可。
5.2 共享常量
父Chart的values.yaml,增加以下内容,注意节点的名字必须是子chart名。
imageCredentials:
  registry: http://192.168.1.40
  username: admin
  password: Yidongjituan123
replicaCount: 1
image:
  repository: 192.168.1.40/xzzyy/vue-saas
  tag: 95e740c61bd7f9b4b3be62f819d00f90fe10ac24
service:
  port: 40099
global:
  nameSpace: microservice
  secretsName: mysecret
  configmapName: demo-config

eureka:
  replicaCount: 1
  image:
    repository: 192.168.1.40/xzzyy/eureka
    tag: bff976dda6786a2b593ccf5a76bd2e1cf670e615
  service:
    port: 40000

oauth2:
  replicaCount: 1
  image:
    repository: 192.168.1.40/xzzyy/oauth2
    tag: bff976dda6786a2b593ccf5a76bd2e1cf670e615
  service:
    port: 40001

ws:
  replicaCount: 1
  image:
    repository: 192.168.1.40/xzzyy/doctor-ws
    tag: bff976dda6786a2b593ccf5a76bd2e1cf670e615
  service:
    port: 40002

ms:
  replicaCount: 1
  image:
    repository: 192.168.1.40/xzzyy/online-registration-ms
    tag: bff976dda6786a2b593ccf5a76bd2e1cf670e615
  service:
    port: 40003
在eureka的模板里就可以通过{{ .Values.replicaCount }} 来引用。当Helm发现节点名是子chart名时,它会自动引用这个常量到子chart的values.yaml中。 因此,在oauth2中,你也可以通过{{ .Values.image.repository }} 来访问这个常量。
如果出现父Chart与子Chart中都定义了相同的values值,那么helm会以父Chart为准,覆盖子Chart中相同的值。
模板文件参考
_helpers.tpl
{{/* vim: set filetype=mustache: */}}
{{/*
Expand the name of the chart.
展开chart的名称。
*/}}
{{- define "vue.name" -}}
{{- default .Chart.Name .Values.nameOverride | trunc 63 | trimSuffix "-" }}
{{- end }}

{{/*
Create a default fully qualified app name.
We truncate at 63 chars because some Kubernetes name fields are limited to this (by the DNS naming spec).
If release name contains chart name it will be used as a full name.

创建一个默认的完全限定应用名称。
我们截断为 63 个字符,因为某些 Kubernetes 名称字段仅限于此(受 DNS 命名规范)。
如果发布名称包含chart名称,它将用作全名。
*/}}
{{- define "vue.fullname" -}}
{{- if .Values.fullnameOverride }}
{{- .Values.fullnameOverride | trunc 63 | trimSuffix "-" }}
{{- else }}
{{- $name := default .Chart.Name .Values.nameOverride }}
{{- if contains $name .Release.Name }}
{{- .Release.Name | trunc 63 | trimSuffix "-" }}
{{- else }}
{{- printf "%s-%s" .Release.Name $name | trunc 63 | trimSuffix "-" }}
{{- end }}
{{- end }}
{{- end }}

{{/*
Create chart name and version as used by the chart label.
创建chart标签使用的chart名称和版本。
*/}}
{{- define "vue.chart" -}}
{{- printf "%s-%s" .Chart.Name .Chart.Version | replace "+" "_" | trunc 63 | trimSuffix "-" }}
{{- end }}

{{/*
Common labels
常用标签
*/}}
{{- define "vue.labels" -}}
helm.sh/chart: {{ include "vue.chart" . }}
{{ include "vue.selectorLabels" . }}
{{- if .Chart.AppVersion }}
app.kubernetes.io/version: {{ .Chart.AppVersion | quote }}
{{- end }}
app.kubernetes.io/managed-by: {{ .Release.Service }}
{{- end }}

{{/*
Selector labels
选择器标签
*/}}
{{- define "vue.selectorLabels" -}}
app.kubernetes.io/name: {{ include "vue.name" . }}
app.kubernetes.io/instance: {{ .Release.Name }}
{{- end }}

{{/*
Create the name of the service account to use
创建要使用的服务帐户的名称
*/}}
{{- define "vue.serviceAccountName" -}}
{{- if .Values.serviceAccount.create }}
{{- default (include "vue.fullname" .) .Values.serviceAccount.name }}
{{- else }}
{{- default "default" .Values.serviceAccount.name }}
{{- end }}
{{- end }}
常见命令
# 基于本地Chart目录部署
$ helm install -f values.yaml -n ci-gitee-nginx ci-gitee-nginx ./

# 删除release
$ helm uninstall -n ci-gitee-nginx ci-gitee-nginx
$ helm delete -n ci-gitee-nginx ci-gitee-nginx

# 查看版本历史
$ helm history -n ci-gitee-nginx ci-gitee-nginx

# 下载Chart
$ helm fetch xinlin/k8sapp

# 基于本地Chart目录部署
$ helm install ./k8sapp

# 安装本地 chart
$ helm install -f myvalues.yaml myredis ./redis

# 检查charts的依赖及模板配置是否正确
$ helm lint example/


为了检测生成的清单,但并不安装到chart,可以将 --debug 和 --dry-run组合使用。

如果设置了—verify,chart必须有出处文件,且出处文件必须传递所有的验证步骤。

有五种不同的方式来标识需要安装的chart:

1.通过chart引用: helm install mymaria example/mariadb

2.通过chart包: helm install mynginx ./nginx-1.2.3.tgz

3.通过未打包chart目录的路径: helm install mynginx ./nginx

4.通过URL绝对路径: helm install mynginx https://example.com/charts/nginx-1.2.3.tgz

5.通过chart引用和仓库url: helm install —repo https://example.com/charts/ mynginx nginx


# 指定变量
$ helm install --set name=prod myredis ./redis

# 指定变量的值为 string 类型
$ helm install --set-string long_int=1234567890 myredis ./redis

# 指定引用的文件地址
$ helm install --set-file my_script=dothings.sh myredis ./redis

# 同时指定多个变量
$ helm install --set foo=bar --set foo=newbar  myredis ./redis

# 卸载helm安装包
$ helm uninstall demoapp -n demoapp

# 打包
$ helm package nginx_text

# 运行一个测试容器,访问helm测试
$ kubectl run busybox --rm -ti --image=busybox /bin/sh

# 搜索
$ helm search k8sapp

# 启动本地仓库服务
$ helm serve


# 查看所有namespaces中部署的release
$ helm list --all-namespaces

# 查看某Release的相关状态信息
$  helm status ci-gitee-release -n ci-gitee-release
NAME: ci-gitee-release
LAST DEPLOYED: Thu Apr  8 10:46:33 2021
NAMESPACE: ci-gitee-release
STATUS: deployed
REVISION: 1
TEST SUITE: None

# 查看由Charts定义的容器化应用是否能够正确部署,调试
$ helm install demoapp --debug ./demoapp --dry-run -n demoapp --set service.type=NodePort
参考文献:
Helm v3 安装使用